Introduction
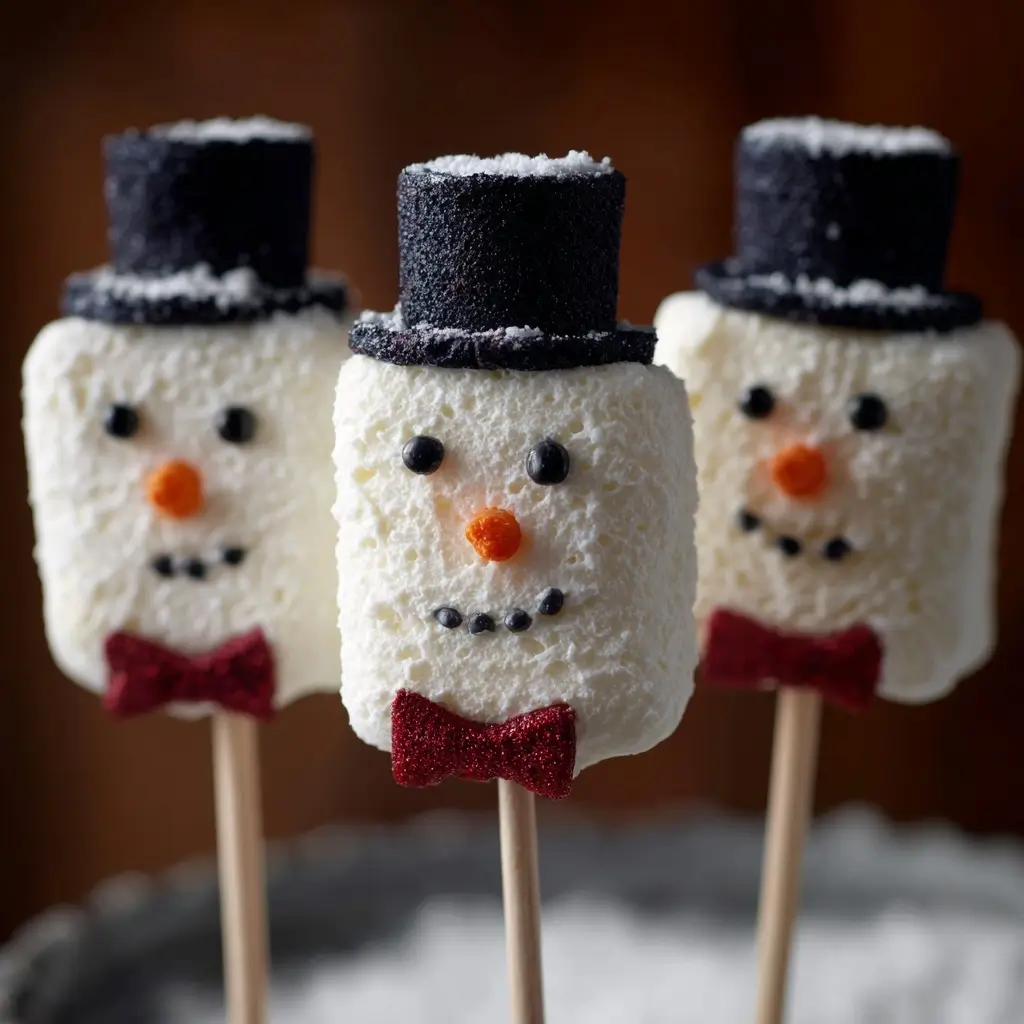
Snowman Marshmallow Pops are a whimsical, festive treat perfect for the holiday season. These adorable edible snowmen are not only fun to make but also a delightful project to enjoy with children and family during winter celebrations. Combining fluffy marshmallows, colorful decorations, and creative flair, these pops transform simple ingredients into charming confections that double as party favors, classroom treats, or cheerful gifts. Whether you’re hosting a holiday gathering or simply looking for a sweet craft to brighten up cold winter days, Snowman Marshmallow Pops offer a magical blend of taste, creativity, and seasonal joy.
The History
While there’s no definitive historical origin for Snowman Marshmallow Pops, their concept draws from longstanding traditions of using food as festive decoration during winter holidays. The use of marshmallows in confectionery dates back to ancient Egypt, where they were made from the mallow plant root. Modern marshmallows, as we know them, became popular in the 19th century with industrial sugar production. By the 20th century, marshmallows were commonly used in desserts like rice krispie treats and s’mores. The idea of decorating marshmallows into characters—especially snowmen—gained popularity in the late 1900s, particularly in American households celebrating Christmas. Craft-based treats surged with the rise of Pinterest, cooking blogs, and DIY holiday crafts, making Snowman Marshmallow Pops a staple in holiday activity books, school parties, and family kitchens around the world.
Ingredients Breakdown
The beauty of Snowman Marshmallow Pops lies in their simplicity and accessibility. Each ingredient serves both a structural and decorative purpose:
- Large Marshmallows: Serve as the snowman’s head. Their smooth, white surface is ideal for drawing facial features.
- Mini Marshmallows: Used for the body and arms. They’re light, easy to glue together, and maintain the snowy aesthetic.
- Lollipop Sticks or Cake Pop Sticks: Provide support so the snowman stands upright and can be easily handled.
- Melting Chocolate (White or Dark): Acts as edible “glue” to attach pieces and add details like eyes, mouth, and buttons.
- Candy Melts or Candy Coating: Often used for drizzling or creating scarves and hats; available in various colors and easy to melt.
- Frosting or Edible Glue: A mix of powdered sugar and water or store-bought edible adhesive helps secure lightweight decorations.
- Gel Food Coloring or Edible Markers: For drawing faces, eyebrows, and other fine details without melting the marshmallow.
- Mini Chocolate Chips or Candy Eyes: Add personality—chocolate chips make classic eyes and mouths, while candy eyes give a more playful look.
- Orange Candy or Gel: Used for the nose (often a mini fondant carrot or orange sprinkle).
- Assorted Decorations: Includes tiny gumdrops, sprinkles, colored sugars, licorice strings (for arms), and small candies for scarves and buttons.
- Wax Paper or Silicone Mat: Essential for preventing sticking during assembly and drying.
Step-by-Step Recipe
- Prepare Your Workspace: Cover your countertop or tray with wax paper or a silicone mat. Lay out all ingredients, tools, and decorations within easy reach.
- Insert the Stick: Carefully push a lollipop stick halfway into the bottom of a large marshmallow (this will be the head). Set aside.
- Create the Body: Stack two or three mini marshmallows vertically on the same stick, pressing gently so they adhere. The stick should run through all layers for stability.
- Let It Set: Allow the base (body + stick) to sit for 5–10 minutes so the marshmallows slightly settle and stabilize.
- Attach the Head: Dip the top of the body stack in melted chocolate or frosting, then gently press the large marshmallow (head) onto it. Hold for a few seconds to secure.
- Decorate the Face: Use edible markers or gel coloring to draw eyes, a mouth, and eyebrows. Alternatively, press mini chocolate chips or candy eyes into the head for features.
- Add the Nose: Cut a small triangle from orange fondant or use an orange sprinkle to form a carrot nose. Attach with a dab of frosting.
- Create Arms: Insert short pieces of black licorice or pretzel sticks into the sides of the body marshmallows to resemble arms.
- Design Buttons: Use mini chocolate chips, colored sprinkles, or dots of melted dark chocolate down the center of the body as buttons.
- Make a Scarf: Cut thin strips of fruit leather, red licorice, or use piped candy melts in red or green to wrap around the neck area. Let it drape slightly for realism.
- Add a Hat (Optional): Use a small round chocolate for the top of the head and a wider one below for the brim, or cut a mini cookie into a top hat shape. Secure with melted chocolate.
- Final Touches: Drizzle white or colored candy melts over the pops for a frosty effect, mimicking snowfall. Sprinkle with edible glitter or sanding sugar for extra sparkle.
- Dry Completely: Place the finished pops upright in a foam block or cup holder to dry for 30–60 minutes, ensuring decorations set properly.
Tips
- Work Quickly with Melted Chocolate: Chocolate hardens fast. Use a microwave in 15-second bursts, stirring frequently, or a double boiler for even melting.
- Use Toothpicks for Detailing: A toothpick is perfect for placing tiny candies, drawing lines, or fixing misaligned parts.
- Keep Hands Cool: Marshmallows get sticky when warm. Wash and dry hands often, or wear food-safe gloves.
- Stabilize the Base: If the pop wobbles, reinforce the stick connection by adding a small drop of hardened chocolate at the marshmallow-stick junction.
- Avoid Humidity: High moisture can cause condensation on marshmallows, making decorations slide off. Work in a dry, cool room.
- Prep Decorations Ahead: Pre-cut licorice, portion candy, and melt chocolates before starting assembly for smoother workflow.
- Use Edible Glue for Precision: For delicate attachments (like tiny eyes or scarf ends), edible glue holds better than frosting.
- Chill Before Serving (Optional): Briefly refrigerate pops to firm them up—but bring to room temperature before serving to prevent condensation.
Variations and Customizations
Snowman Marshmallow Pops are highly customizable. Here are some fun variations to try:
- Themed Snowmen: Create Santa snowmen with red hats and white trim, or elf-themed pops with green scarves and pointy shoes.
- Gluten-Free or Vegan Versions: Use certified gluten-free marshmallows and vegan chocolate/candy melts to accommodate dietary needs.
- Seasonal Twists: Make Easter bunnies (pink marshmallows, bunny ears), pumpkin heads for Halloween, or heart-shaped versions for Valentine’s Day.
- Flavored Marshmallows: Experiment with vanilla, peppermint, or almond-flavored marshmallows for a taste twist.
- Chocolate-Dipped Pops: After decorating, dip the entire marshmallow pop in tempered chocolate for a crunchy shell.
- Mini Pop Skewers: Use shorter sticks and create bite-sized versions for dessert platters or cupcakes.
- Personalized Messages: Pipe names or holiday greetings with edible ink or royal icing for party favors.
- Nativity-Inspired Angels: Replace snowman elements with halos (bend wire or use white candy rings) and wings made from meringue or fondant.
- Edible Paint Effects: Use luster dust mixed with vodka or lemon extract to airbrush or paint shimmering details.
- Non-Candy Alternatives: Use dried fruit slices, toasted coconut flakes, or seeds for a healthier, natural decoration approach.
Health Considerations and Nutritional Value
Snowman Marshmallow Pops are a treat best enjoyed in moderation due to their high sugar content and processed ingredients. Here’s what to consider:
- Sugar Content: Marshmallows and candy coatings are primarily sugar and corn syrup, which can spike blood glucose levels. One pop may contain 20–30 grams of sugar, depending on size and decorations.
- Calories: Estimated at 80–150 calories per pop, varying with added chocolate, licorice, and candy.
- Allergens: Common allergens include dairy (in chocolate), soy, gelatin (animal-derived in most marshmallows), and gluten (in some additives). Always check labels if serving guests with allergies.
- Gelatin Concerns: Traditional marshmallows contain pork or beef gelatin. Vegetarian/vegan alternatives use agar-agar or plant-based proteins.
- Food Dyes: Artificial colors in candies and decorations may affect sensitive individuals, especially children. Opt for natural food colorings when possible.
- Portion Control: Serve as part of a balanced holiday spread rather than a standalone snack.
- Healthy Swaps: Use low-sugar marshmallows, dark chocolate (higher cocoa, less sugar), and natural decorations like chopped nuts or freeze-dried fruit.
Ingredients
- 6 large marshmallows
- 18 mini marshmallows (3 per pop)
- 6 lollipop sticks or cake pop sticks
- 1 cup white chocolate chips or candy melts
- 1/4 cup dark chocolate chips or candy melts
- 6 orange sprinkles or small fondant carrots
- 12 mini chocolate chips (for eyes)
- 6–12 additional mini chocolate chips (for mouths and buttons)
- 6 pieces black licorice (about 2 inches each, for arms)
- 6 red fruit leather strips or red licorice laces (for scarves)
- Edible marker (black) or food-safe gel coloring
- 1 tablespoon vegetable shortening or coconut oil (to ease melting)
- Optional: candy eyes, edible glitter, sprinkles, small cookies for hats
- Wax paper or silicone baking mat
Directions
- Line a baking sheet with wax paper and insert lollipop sticks into the bottom of each large marshmallow (heads). Set aside.
- Stack three mini marshmallows on each of six additional sticks to form the bodies. Press gently to secure.
- In a microwave-safe bowl, melt white chocolate chips with 1/2 teaspoon of shortening in 15-second intervals, stirring until smooth. Repeat with dark chocolate in a separate bowl.
- Dip the top of each body stack into melted white chocolate and immediately attach a large marshmallow (head). Hold for 10 seconds to set.
- Using a toothpick or small spoon, dot on small circles for eyes using dark chocolate or press in mini chocolate chips.
- Add an orange sprinkle or fondant piece diagonally for the nose.
- Draw a smiling mouth beneath the nose using an edible marker or melted dark chocolate.
- Push a piece of black licorice into each side of the body for arms.
- Use piped red fruit leather or red candy melts to wrap a scarf around the base of the head.
- Dab 3–4 dark chocolate dots down the center of the body for buttons.
- If desired, place a small round chocolate or cookie on top for a hat, securing with melted chocolate.
- Drizzle remaining white chocolate over the pops for a snowy effect. Sprinkle with edible glitter or white sugar.
- Let the pops stand upright in a foam block or cup for 30–60 minutes until fully set.
- Once dry, carefully wrap individually in cellophane or display on a festive tray.
FAQ
Q: Can I make Snowman Marshmallow Pops ahead of time?
A: Yes! They can be stored in an airtight container at room temperature for up to 5 days. Keep away from heat and humidity to prevent melting.
Q: How do I store them?
A: Store in a cool, dry place in a single layer. Avoid refrigeration unless necessary, as condensation can make marshmallows soggy.
Q: Can I use regular chocolate instead of candy melts?
A: Yes, but real chocolate may need tempering to harden properly. Adding a little shortening improves consistency for drizzling.
Q: Are these kid-friendly to make?
A: Absolutely! They’re a fantastic holiday activity for kids ages 4 and up, especially with adult supervision for melting and handling sticks.
Q: What can I use instead of licorice?
A: Pretzel sticks, chow mein noodles, or even small twigs of dried fruit roll-ups work as arm substitutes.
Q: Can I make them without sticks?
A: Yes! Create flat snowmen on crackers, cookies, or as part of a dessert charcuterie board.
Q: How do I prevent the marshmallows from tearing?
A: Moisten the stick slightly or warm it under hot water before inserting. Push slowly and steadily.
Q: Are there nut-free options?
A: Yes—ensure all candies and chocolates are processed in nut-free facilities if allergies are a concern.
Summary
Snowman Marshmallow Pops are a joyful, customizable holiday treat that combines simple ingredients with creative fun. Perfect for gifting, parties, or family crafting, they bring smiles and sweetness to any winter celebration.