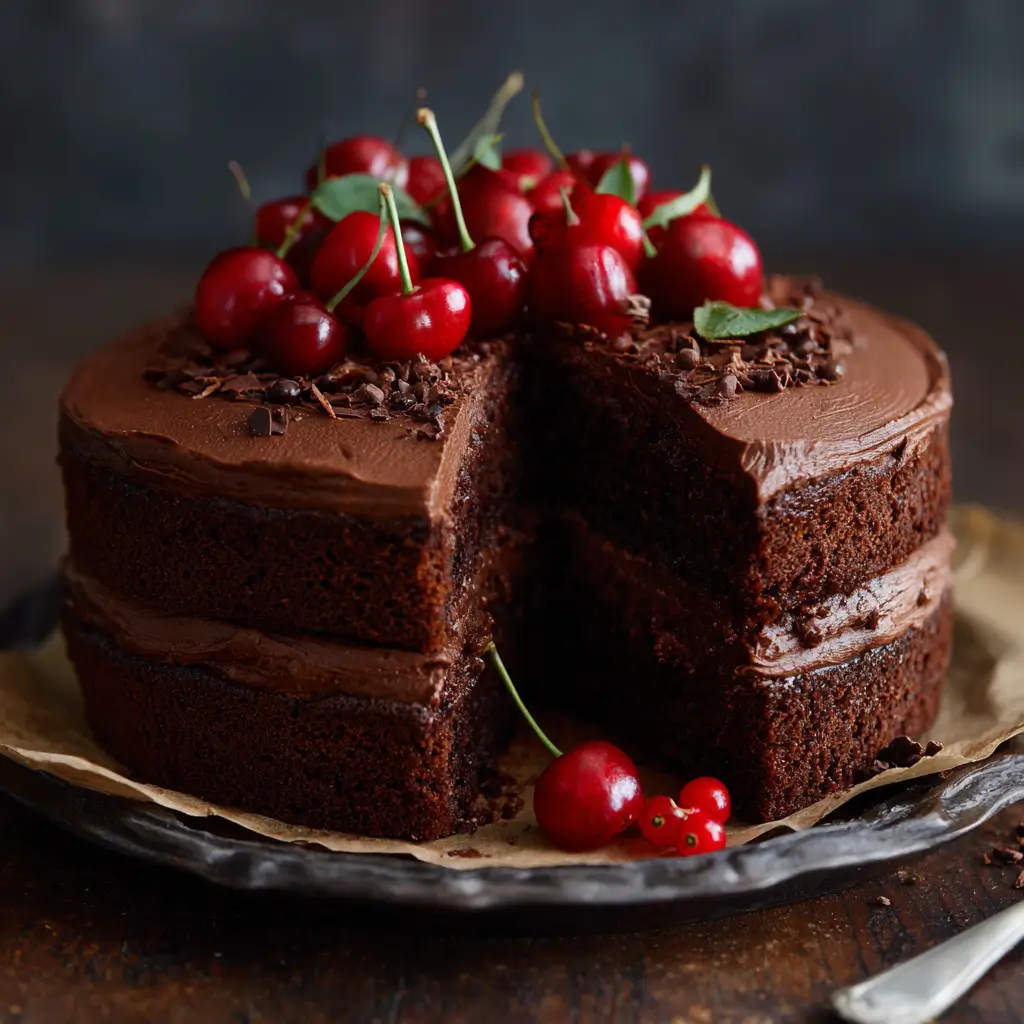
Introduction Devil’s Food Chocolate Cake is a rich, decadent dessert that has captured the hearts of chocolate lovers for generations. Known for its deep, dark color and intensely moist texture, this cake stands apart from traditional chocolate cakes thanks to its bold cocoa flavor and airy crumb. Unlike its milder cousin, the classic chocolate cake, Devil’s Food Cake uses ingredients that enhance both bitterness and sweetness, creating a complex flavor profile that lingers on the palate. Whether served at birthdays, holidays, or as an indulgent weeknight treat, this cake never fails to impress. The name “Devil’s Food” evokes a sense of sinfully delicious temptation—fitting for a dessert so luxuriously rich. It’s not just the taste that sets it apart; the texture is light yet dense enough to feel satisfying, and the aroma of warm chocolate fills the kitchen as it bakes. This isn’t just a cake—it’s an experience. With layers of velvety chocolate frosting and a crumb that melts in your mouth, Devil’s Food Chocolate Cake is the ultimate celebration of all things chocolate. The History The origins of Devil’s Food Cake trace back to early 20th-century America, emerging during a time when home baking was becoming increasingly popular and accessible. The term “devil’s food” was first used in print around 1905, appearing in cookbooks such as The Boston Cooking-School Cook Book by Fannie Merritt Farmer. At the time, cakes were often categorized by their color and richness: angel food cake represented purity and lightness, while devil’s food stood as its darker, more indulgent counterpart. Unlike yellow or white cakes, which relied on butter and eggs for richness, Devil’s Food Cake was distinguished by its use of unsweetened cocoa powder and sometimes melted chocolate. What truly set it apart, however, was the chemical reaction between cocoa and baking soda. Natural cocoa is acidic, and when combined with baking soda (an alkali), it produces a deeper color and fluffier texture—giving the cake its signature lift and raven-black hue. Some bakers even added coffee or boiling water to intensify the chocolate flavor, a technique still widely used today. By the 1930s and 1940s, boxed cake mixes began to emerge, and manufacturers quickly capitalized on the popularity of Devil’s Food Cake. Brands like Duncan Hines and Betty Crocker introduced their own versions, making this once-specialty dessert a household staple. Over the decades, the recipe evolved with changing tastes and ingredient availability, but the core principles remained: intense chocolate flavor, moist crumb, and a luxurious mouthfeel. Today, Devil’s Food Cake continues to be a favorite across the United States and beyond. It’s a centerpiece at celebrations, a star on bakery shelves, and a beloved project for home bakers looking to master the art of chocolate desserts. Its legacy endures not only because of its taste but also because of its cultural significance—a symbol of indulgence, comfort, and culinary craftsmanship. Ingredients Breakdown Creating the perfect Devil’s Food Chocolate Cake begins with understanding each ingredient’s role in building flavor, texture, and structure. Here’s a detailed breakdown of every component: All-Purpose Flour: Provides the structural foundation of the cake. It contains gluten-forming proteins that give the cake its shape and stability without making it tough when properly measured and mixed. Unsweetened Cocoa Powder: The heart and soul of the cake. High-quality natural cocoa powder (not Dutch-processed) is preferred for its acidity, which reacts with baking soda to create a rich color and airy texture. It delivers a sharp, intense chocolate flavor that defines the cake. Granulated Sugar: Adds sweetness and helps retain moisture. It also contributes to the cake’s tender crumb by interfering with gluten development and aiding in browning during baking. Baking Soda: Acts as a leavening agent. When combined with the acidic components (cocoa and buttermilk), it produces carbon dioxide bubbles that help the cake rise and become light and fluffy. Baking Powder: Works alongside baking soda to provide additional lift, ensuring the cake rises evenly and maintains a soft, open crumb. Salt: Enhances all the flavors in the cake, balancing sweetness and bringing out the depth of the chocolate. Eggs: Provide structure, richness, and emulsification. They help bind the ingredients together and contribute to the cake’s moist, tender texture. Vegetable Oil: Keeps the cake incredibly moist. Unlike butter, oil remains liquid at room temperature, resulting in a softer crumb and longer shelf life. Vanilla Extract: Adds a subtle aromatic complexity that complements the chocolate without overpowering it. Buttermilk: Contributes acidity, tenderness, and moisture. The lactic acid in buttermilk reacts with baking soda to boost leavening and tenderize the gluten in the flour. Hot Coffee or Boiling Water: Though optional, hot liquid is essential for blooming the cocoa, intensifying its flavor, and thinning the batter for a smoother texture. Coffee enhances the chocolate notes without making the cake taste like coffee—especially effective in deepening the overall richness. Unsalted Butter (for frosting): Forms the base of the chocolate buttercream, providing a creamy, smooth consistency and rich flavor. Powdered Sugar (for frosting): Sweetens and thickens the frosting while giving it a silky texture. Semi-Sweet Chocolate (for frosting): Melted and incorporated into the buttercream for an extra layer of chocolate intensity. Heavy Cream or Milk (for frosting): Adjusts the consistency of the frosting, making it spreadable or pipeable depending on preference. Step-by-Step Recipe Follow these detailed instructions to bake a flawless Devil’s Food Chocolate Cake with lush chocolate frosting. Preheat and Prepare: Preheat your oven to 350°F (175°C). Grease and flour two 9-inch round cake pans, line the bottoms with parchment paper, and set aside. Mix Dry Ingredients: In a large bowl, sift together 1¾ cups (220g) all-purpose flour, ¾ cup (65g) unsweetened natural cocoa powder, 2 cups (400g) granulated sugar, 1½ teaspoons baking soda, 1 teaspoon baking powder, and ½ teaspoon salt. Sifting ensures no lumps and even distribution. Whisk Wet Ingredients: In a separate bowl, whisk together 2 large eggs, ½ cup (120ml) vegetable oil, 2 teaspoons vanilla extract, and 1 cup (240ml) buttermilk until smooth and well combined. Combine Wet and Dry: Gradually add the wet ingredients to the dry mixture, stirring gently with a whisk or spatula until just combined. Do not overmix. Add Hot Liquid: Carefully stir in 1 cup (240ml) of hot brewed coffee or boiling water. The batter will become very thin—this is normal and essential for a moist cake. Pour and Bake: Divide the batter evenly between the prepared pans. Bake for 30–35 minutes, or until a toothpick inserted into the center comes out clean or with a few moist crumbs. Cool Completely: Allow the cakes to cool in the pans for 10 minutes, then run a knife around the edges and invert them onto wire racks. Remove parchment paper and let cool completely before frosting. Prepare Chocolate Frosting: In a heatproof bowl, melt 8 oz (225g) semi-sweet chocolate and set aside to cool slightly. In a large bowl, beat 1 cup (2 sticks / 227g) unsalted butter until creamy. Gradually add 4 cups (480g) powdered sugar, alternating with ¼ cup (60ml) heavy cream or milk. Mix in the melted chocolate and 1 teaspoon vanilla extract. Beat on high speed for 3–4 minutes until light and fluffy. Add more cream if needed for desired consistency. Frost the Cake: Place one cake layer on a serving plate. Spread a generous layer of frosting on top. Add the second layer and frost the top and sides evenly. Use a bench scraper or offset spatula for a smooth finish. Decorate (Optional): Garnish with chocolate shavings, sprinkles, fresh berries, or edible gold dust for an elegant touch. Chill Before Serving: For best results, refrigerate the cake for 20–30 minutes to set the frosting before slicing. Tips Use Natural Cocoa: For the best rise and deepest color, choose natural unsweetened cocoa powder (like Hershey’s) rather than Dutch-processed, unless your recipe specifically calls for it. Don’t Skip the Coffee: Even if you don’t like coffee, using hot brewed coffee instead of water enhances the chocolate flavor dramatically without adding a coffee taste. Avoid Overmixing: Once you add the dry ingredients to the wet, mix only until combined. Overmixing develops gluten, leading to a dense, tough cake. Check Oven Temperature: Use an oven thermometer to ensure accuracy. An oven that runs too hot or cold can affect the cake’s rise and texture. Cool Completely: Never frost a warm cake—it will melt the frosting and cause it to slide off. Let layers cool fully on wire racks. Sift the Cocoa: Cocoa powder tends to clump. Sifting it with the flour prevents pockets of dry cocoa in the batter. Use Room Temperature Eggs: Cold eggs can cause the batter to curdle when mixed with oil and buttermilk. Take them out 30 minutes before baking. Even Layers: Use a kitchen scale to divide the batter equally between pans for uniform thickness and even baking. Sharp Knife for Slicing: Dip a sharp knife in hot water and wipe it dry before each slice for clean, neat cuts through the frosting. Store Properly: Keep the cake covered at room temperature for up to 2 days or refrigerate for up to 5 days. Bring to room temperature before serving for best texture. Variations and Customizations While the classic Devil’s Food Cake is a masterpiece on its own, there are countless ways to personalize it for different occasions and tastes: Gluten-Free Version: Substitute all-purpose flour with a high-quality gluten-free flour blend containing xanthan gum. Test brands like Bob’s Red Mill 1-to-1 or King Arthur Measure for Measure. Dairy-Free Option: Replace buttermilk with a mixture of almond milk and lemon juice (1 tbsp per cup), use dairy-free margarine, and choose dairy-free chocolate and cream alternatives. Vegan Devil’s Cake: Use flax eggs (1 tbsp ground flax + 3 tbsp water per egg), plant-based milk with vinegar, vegan butter, and eggless chocolate. Ensure sugar is vegan-certified. Moisture Boost: Add ½ cup sour cream or Greek yogurt to the batter for extra richness and moisture. Flavor Infusions: Stir in 1 tsp instant espresso powder, orange zest, cinnamon, or cayenne pepper to elevate the chocolate flavor with unique undertones. Liquor-Infused Cake: Brush cooled layers with a simple syrup made with bourbon, Kahlúa, or Baileys for a boozy twist. Filling Ideas: Layer with chocolate ganache, raspberry jam, peanut butter frosting, or salted caramel for a gourmet effect. Three-Layer Cake: Bake in three 8-inch pans for a taller, more impressive presentation—perfect for weddings or birthdays. Cupcake Conversion: Fill lined muffin tins ⅔ full and bake at 350°F for 18–22 minutes. Top with swirls of chocolate buttercream. Mini Cakes: Use individual ramekins or mason jars for single-serving desserts. Nutty Crunch: Fold chopped walnuts, pecans, or hazelnuts into the batter for added texture. <
Devil’s Food Chocolate Cake