Screaming Ghost Donuts: A Spooktacular Treat for Halloween and Beyond
When the autumn breeze begins to chill and the leaves turn golden, it’s time to embrace the spirit of Halloween with a deliciously eerie twist—enter the Screaming Ghost Donut. These adorable, hauntingly sweet treats are more than just pastries; they’re edible art that brings joy, laughter, and a touch of fright to every gathering. With their fluffy donut bodies, ghostly white glaze, and wide-open screaming mouths, these donuts are guaranteed to be the talk of any Halloween party, school event, or spooky-themed celebration. Whether you’re baking them with your kids or impressing guests at a themed dinner, Screaming Ghost Donuts blend whimsy, flavor, and creativity into one unforgettable dessert.
The History Behind the Haunt
The concept of ghost-shaped desserts has been floating around in culinary folklore for decades, especially during Halloween festivities. However, the modern iteration of the “Screaming Ghost Donut” gained popularity in the early 2010s, thanks to viral food blogs and social media platforms like Pinterest and Instagram. Inspired by classic American donuts and Japanese mochi donuts, bakers began experimenting with shapes, glazes, and edible decorations to create playful, seasonal confections.
The screaming effect—a wide-open mouth made from black icing or candy—was likely inspired by pop culture icons such as the Casper the Friendly Ghost franchise and the infamous “scream” masks seen in horror films. Over time, home bakers and pastry chefs alike began perfecting the recipe, combining soft cake donuts with smooth vanilla glaze and expressive facial features to create a treat that is both cute and creepy. Today, Screaming Ghost Donuts are a staple of Halloween bakeries, DIY craft events, and family kitchen adventures across North America and beyond.
Ingredients Breakdown: What Makes These Donuts So Hauntingly Good?
The magic of Screaming Ghost Donuts lies not only in their appearance but also in their rich, melt-in-your-mouth texture and balanced sweetness. Let’s take a closer look at each ingredient and its role in crafting this ghoulish delight:
- All-Purpose Flour: The backbone of the donut, providing structure and softness when combined with leavening agents.
- Baking Powder & Baking Soda: These work together to give the donuts their light, airy rise—essential for that pillowy texture.
- Salt: Enhances flavor and balances the sweetness without being detectable on its own.
- Granulated Sugar: Adds sweetness and helps tenderize the crumb while contributing to browning during frying.
- Butter (Unsalted): Imparts richness and a luxurious mouthfeel. Melted and cooled butter integrates smoothly into the batter.
- Eggs: Bind the ingredients together and add moisture and structure. Room temperature eggs mix more evenly.
- Milk: Keeps the batter moist and contributes to a tender texture. Whole milk is preferred for creaminess.
- Vanilla Extract: Provides warm, aromatic depth that complements the sweetness perfectly.
- Nutmeg (optional): A pinch adds a subtle warmth and complexity, enhancing the overall flavor profile.
- Vegetable Oil (for frying): Neutral-flavored oils with high smoke points ensure even cooking without overpowering the donut’s taste.
- Powdered Sugar: Forms the base of the ghostly white glaze, dissolving into a silky, glossy finish.
- Heavy Cream or Milk (for glaze): Thins the glaze to the ideal dipping consistency.
- Vanilla Bean Paste or Extract (for glaze): Elevates the glaze with a fragrant sweetness.
- Black Gel Food Coloring or Edible Ink: Used sparingly to draw the gaping, screaming mouths—more dramatic than regular food coloring.
- Edible Glitter or Sprinkles (optional): For extra sparkle—like ectoplasmic shimmer!
Step-by-Step Recipe: How to Make Screaming Ghost Donuts from Scratch
Creating your own batch of Screaming Ghost Donuts may seem daunting, but with careful preparation and attention to detail, you’ll have bakery-quality results right in your kitchen. Follow these detailed steps for success:
- Prepare Your Workspace: Clear a clean surface and gather all tools: mixing bowls, whisk, spatula, electric mixer (hand or stand), piping bag or plastic bag with corner snipped, donut cutter or round cookie cutters (2.5″ outer diameter, 0.75″ inner), deep fryer or heavy-bottomed pot, slotted spoon, wire rack, and paper towels.
- Make the Donut Batter: In a large bowl, sift together 2 cups all-purpose flour, 1 tablespoon baking powder, 1/4 teaspoon baking soda, 1/4 teaspoon salt, 1/2 teaspoon ground nutmeg (if using), and 1/3 cup granulated sugar. Whisk to combine.
- Combine Wet Ingredients: In a separate bowl, beat 1 large egg lightly. Add 1/4 cup melted and cooled unsalted butter, 1/2 cup milk, and 1 teaspoon vanilla extract. Mix until smooth and emulsified.
- Mix Wet and Dry Ingredients: Gradually pour the wet mixture into the dry ingredients. Stir gently with a spatula just until combined—do not overmix. The batter should be thick but scoopable, similar to muffin batter.
- Rest the Batter: Cover and let rest for 15–20 minutes. This allows the flour to hydrate fully and improves texture.
- Heat the Oil: Pour 2–3 inches of vegetable oil into a heavy pot or deep fryer. Heat over medium heat to 350°F (175°C). Use a candy thermometer for accuracy.
- Shape the Donuts: Lightly flour a surface. Roll out the dough to about 1/2-inch thickness. Use a 2.5-inch round cutter for the outer shape and a small 0.75-inch cutter (like a bottle cap) for the center hole. Place donuts and holes on a parchment-lined tray. Re-roll scraps once for best texture.
- Fry the Donuts: Carefully place 2–3 donuts at a time into the hot oil. Fry for 60–90 seconds per side, flipping once when golden brown. Remove with a slotted spoon and drain on a wire rack set over paper towels. Repeat with remaining donuts and holes.
- Cool Completely: Allow donuts to cool for at least 20 minutes before glazing. Warm donuts will cause the glaze to slide off.
- Prepare the Ghostly Glaze: In a medium bowl, whisk 2 cups powdered sugar, 2–3 tablespoons heavy cream (or milk), and 1/2 teaspoon vanilla bean paste until smooth. Add liquid gradually to avoid a runny glaze. It should coat the back of a spoon but drip slowly.
- Dip the Donuts: Hold each donut by the edge and dip the top half into the glaze. Allow excess to drip off, then place glazed-side-up on a wire rack. Let the glaze set for 10–15 minutes until firm.
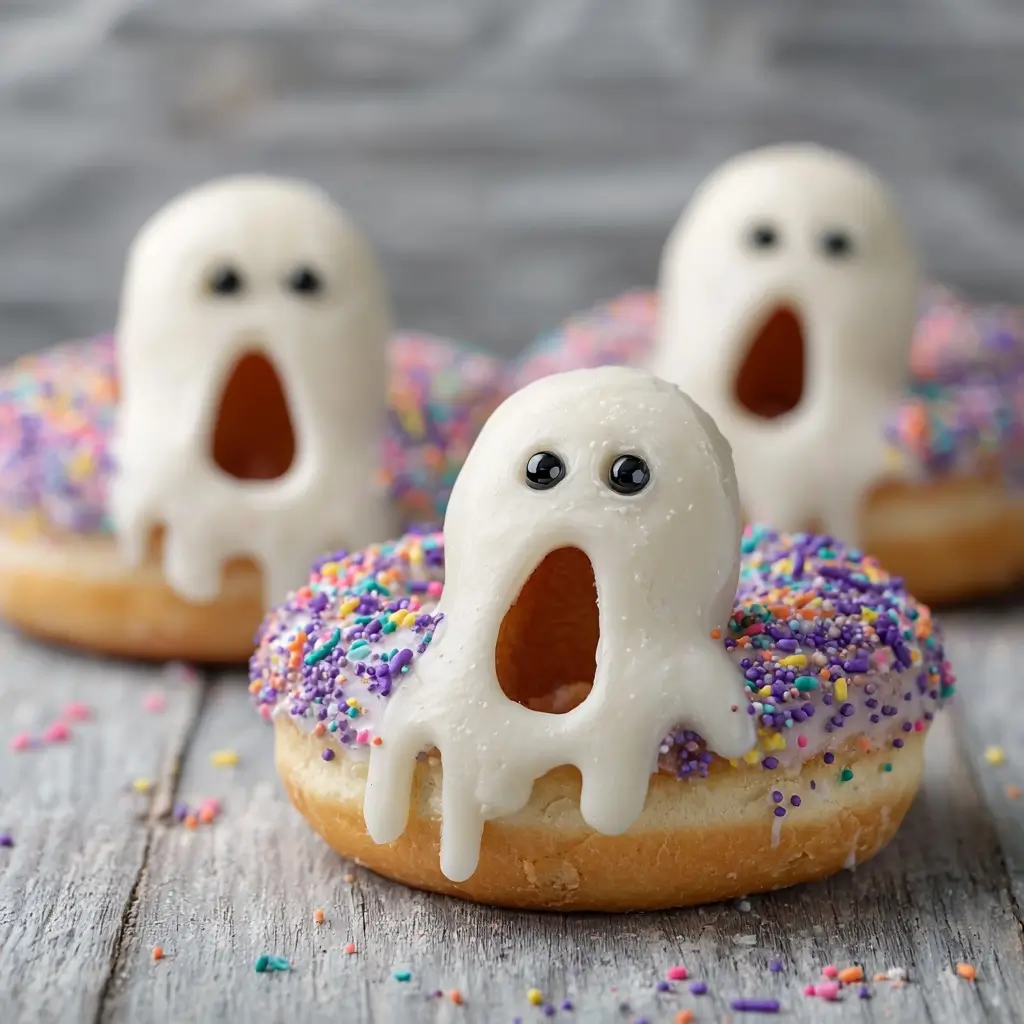
- Create the Screaming Faces: Using a fine-tipped piping bag filled with black gel food coloring or edible ink, draw wide open O-shaped mouths on each donut. For extra drama, add wavy lines inside the mouth to mimic sound waves or jagged teeth. You can also use licorice strings or black candy melts if preferred.
- Add Final Touches: Optional: sprinkle edible glitter over the wet glaze for a ghostly shimmer, or add tiny pink or red dots near the mouth to suggest a tongue or scream droplets.
Expert Tips for Perfect Screaming Ghost Donuts Every Time
- Temperature Control is Key: Keep oil between 345°F and 355°F. Too hot = burnt outside, raw inside. Too cool = greasy, soggy donuts.
- Don’t Overmix the Batter: Overworking develops gluten, leading to tough donuts. Mix until just combined.
- Use Sifted Powdered Sugar: Prevents lumps in the glaze for a perfectly smooth finish.
- Work in Batches: Avoid crowding the fryer, which drops the oil temperature and leads to uneven cooking.
- Glaze When Cool: Always ensure donuts are completely cooled to room temperature before glazing.
- Customize Mouth Expressions: Use different mouth shapes—wide O, sideways shriek, zigzag scream—for variety.
- Storage Tip: Best eaten fresh, but can be stored in an airtight container for up to 2 days. Do not refrigerate—this dries them out.
- Kid-Friendly Fun: Let children decorate their own ghosts with safe-to-use food markers or pre-made stickers.
Variations and Customizations: Make Your Ghost Uniquely Terrifying
Once you’ve mastered the classic version, unleash your inner mad scientist with these creative twists:
- Baked Option: For a healthier alternative, use a donut pan and bake at 350°F for 8–10 minutes. Then brush with melted butter and dip in glaze.
- Gluten-Free: Substitute all-purpose flour with a quality 1:1 gluten-free blend (like Bob’s Red Mill). Add 1/4 tsp xanthan gum if not included.
- Vegan Version: Replace egg with flax egg (1 tbsp ground flax + 3 tbsp water), use plant-based milk and butter, and ensure powdered sugar is vegan (some contain bone char).
- Flavored Glazes: Swap vanilla for almond, coconut, maple, or even lemon zest in the glaze for a unique twist.
- Colored Ghosts: Tint the glaze pale blue, purple, or green using gel colors for a spectral parade.
- Stuffed Donuts: Fill with marshmallow fluff or jam before frying for a gooey surprise.
- Mini Ghosts: Use smaller cutters or a mini donut pan to make bite-sized versions—perfect for parties.
- Glow-in-the-Dark Effect: Use UV-reactive edible paint under blacklight for a rave-worthy haunted dessert table.
- Chocolate Ghosts: Dip half of each donut in dark chocolate and draw mouths with white icing for a reverse ghost effect.
Health Considerations and Nutritional Value
While Screaming Ghost Donuts are undeniably indulgent, understanding their nutritional content helps you enjoy them mindfully:
- Calories: One average-sized donut (including glaze) contains approximately 220–280 calories, depending on size and ingredients.
- Fat: Around 10–14g total fat per donut, primarily from butter and frying oil. Using heart-healthy oils like avocado or sunflower can reduce saturated fat.
- Sugar: High in sugars—about 20–30g per donut—mostly from granulated and powdered sugar. Consider reducing sugar slightly in the batter or using monk fruit-sweetened glaze alternatives for lower sugar options.
- Carbohydrates: Approximately 30–35g per serving, mainly from refined flour. Whole wheat pastry flour can replace up to 50% for added fiber.
- Protein: Modest amount (3–4g) from eggs and milk.
- Allergens: Contains dairy, eggs, wheat, and soy (depending on oil). Always label accordingly for guests.
- Moderation is Key: Best enjoyed as an occasional treat rather than a daily snack. Pair with fruit or yogurt for a balanced dessert spread.
- Dietary Swaps: As noted earlier, gluten-free, vegan, and reduced-sugar versions allow broader accessibility without sacrificing fun.
Full Ingredient List
For the Donuts:
- 2 cups (250g) all-purpose flour
- 1 tablespoon baking powder
- 1/4 teaspoon baking soda
- 1/4 teaspoon salt
- 1/3 cup (67g) granulated sugar
- 1/4 teaspoon ground nutmeg (optional)
- 1 large egg, room temperature
- 1/4 cup (56g) unsalted butter, melted and cooled
- 1/2 cup (120ml) whole milk, room temperature
- 1 teaspoon pure vanilla extract
- Vegetable oil, for frying (enough to fill 2–3 inches in pot)
For the Glaze:
- 2 cups (240g) powdered sugar, sifted
- 2–3 tablespoons heavy cream or whole milk
- 1/2 teaspoon vanilla bean paste or extract
For Decoration:
- Black gel food coloring or edible food marker
- Optional: edible glitter, sprinkles, or glow paint
Detailed Directions
- In a large bowl, sift together flour, baking powder, baking soda, salt, sugar, and nutmeg. Whisk to blend evenly.
- In another bowl, whisk egg briefly. Add melted butter, milk, and vanilla. Stir until well combined.
- Pour wet ingredients into dry ingredients. Gently fold with a spatula until no dry streaks remain. Do not overmix.
- Cover bowl and let batter rest for 15–20 minutes.
- Line a tray with parchment paper. Set aside.
- Heat oil in a heavy pot to 350°F (175°C). Use a thermometer for precision.
- On a lightly floured surface, roll dough to 1/2-inch thickness. Cut into 2.5-inch circles, then remove centers with a smaller cutter.
- Carefully place 2–3 donuts into hot oil. Fry for 60–90 seconds per side until golden. Flip once.
- Remove with slotted spoon and drain on wire rack over paper towels.
- Repeat with remaining donuts, adjusting heat as needed to maintain temperature.
- Let donuts cool completely (about 20 minutes).
- Whisk glaze ingredients until smooth. Adjust thickness with more cream or sugar as needed.
- Dip top half of each donut into glaze. Place on rack to set.
- Once glaze is firm (10–15 mins), use black gel or food pen to draw wide, screaming mouths.
- Optional: add edible glitter or themed sprinkles before glaze sets.
- Serve immediately and watch the screams of delight begin!
Frequently Asked Questions (FAQ)
Q: Can I bake these instead of frying?
A: Absolutely! Use a donut pan, spray with non-stick oil, and bake at 350°F for 8–10 minutes. Brush with butter and dip in glaze after cooling.
Q: How long do Screaming Ghost Donuts last?
A: Best consumed within 24 hours. Store in an airtight container at room temperature for up to 2 days. Avoid refrigeration.
Q: Can I freeze them?
A: Yes! Freeze unglazed donuts in a sealed container for up to 2 months. Thaw, re-crisp in oven at 300°F for 5 minutes, then glaze and decorate.
Q: Why did my donuts come out greasy?
A: Likely due to oil that was too cold. Maintain a steady 350°F and avoid overcrowding the pot.
Q: Can I make the batter ahead of time?
A: Not recommended. Leavening agents lose potency. If necessary, refrigerate for no more than 1 hour before frying.
Q: Are there kid-safe decoration alternatives?
A: Yes! Use store-bought edible googly eyes, pre-cut icing faces, or let kids draw with food-safe markers.
Q: Can I use a donut maker?
A: Yes, though shape may differ. Follow appliance instructions and adjust cooking time accordingly.
Q: What oil is best for frying?
A: Choose neutral oils with high smoke points: vegetable, canola, peanut, or sunflower oil.
Summary
Screaming Ghost Donuts are a festive, homemade Halloween treat that combines fluffy cake donuts with a silky vanilla glaze and hilarious screaming faces for a show-stopping dessert. Easy to customize and fun for all ages, they’re sure to haunt your holiday menu in the best possible way.