Buttermilk Ranch Chicken Tenders: A Crispy, Juicy Delight
There’s something undeniably satisfying about a perfectly cooked chicken tender—crispy on the outside, juicy on the inside, and bursting with flavor. Enter Buttermilk Ranch Chicken Tenders: a modern twist on a classic favorite that brings together the tangy richness of buttermilk and the savory depth of ranch seasoning for an unforgettable bite. Whether you’re cooking for your family, hosting game night, or just craving comfort food at its finest, these tenders are guaranteed to become a staple in your kitchen.
The History of Chicken Tenders
The story of chicken tenders begins in the mid-20th century, when American diners and restaurants began experimenting with more accessible and convenient ways to serve chicken. The “tenderloin,” a small strip of meat located under the breast, was discovered to be exceptionally tender and quick-cooking—ideal for frying. Though some credit the invention to the Puritan Backroom restaurant in Massachusetts during the 1970s, others argue it originated from Southern U.S. home kitchens where fried chicken was already a cultural cornerstone.
Over time, chicken tenders evolved from a regional specialty into a national obsession. Fast-food chains popularized them as “chicken fingers,” while gourmet restaurants elevated them with sauces, breading variations, and global flavors. Today, they’re a beloved menu item across the United States and beyond—especially when marinated in buttermilk and seasoned with ranch spices, which combine Southern frying traditions with the creamy herbiness made famous by Hidden Valley Ranch dressing.
Ingredients Breakdown: What Makes This Recipe Shine
The magic behind Buttermilk Ranch Chicken Tenders lies not only in their taste but in the thoughtful combination of ingredients that work together to deliver maximum flavor, moisture, and crunch. Let’s dive into each component:
- Chicken Tenderloins (or Breast Strips): These naturally tender cuts absorb marinades beautifully and cook quickly without drying out. If using breasts, slicing them evenly ensures consistent cooking.
- Buttermilk: More than just a dairy product, buttermilk is a powerhouse tenderizer. Its mild acidity breaks down proteins gently, resulting in supremely moist meat. It also carries flavors deep into the chicken.
- Ranch Seasoning Mix: Whether homemade or store-bought, ranch seasoning typically includes dried dill, parsley, garlic powder, onion powder, black pepper, and sometimes buttermilk solids. When infused into the marinade, it imparts that iconic cool, herby zing we all love.
- All-Purpose Flour: Used both in the dredging mix and optionally in a double-coating method, flour helps create a sturdy base for breading adhesion and contributes to a golden crust.
- Panko Breadcrumbs (or Regular Breadcrumbs): Panko gives a lighter, crispier texture due to its flakier structure. For extra crunch, some recipes use crushed cornflakes or even potato chips!
- Eggs: Beaten eggs act as a binding agent between the seasoned flour and breadcrumb layers, ensuring an even, cohesive coating.
- Oil for Frying: Neutral oils like canola, vegetable, or peanut oil are ideal because they have high smoke points and don’t overpower the flavor.
- Salt and Pepper: Simple yet essential for balancing the overall flavor profile.
Optional additions include paprika for color and warmth, cayenne for heat, grated Parmesan cheese for umami depth, or smoked garlic powder for complexity.
Step-by-Step Recipe: How to Make Perfect Buttermilk Ranch Chicken Tenders
Follow this detailed guide to achieve restaurant-quality results right in your own kitchen. With patience and attention to detail, you’ll produce tenders that are crispy, flavorful, and incredibly juicy.
- Prepare the Marinade: In a large bowl, whisk together 2 cups of cold buttermilk, 3 tablespoons of ranch seasoning mix (plus extra if desired), 1 teaspoon of salt, and ½ teaspoon of freshly ground black pepper. Add one clove of minced garlic for extra punch, if preferred.
- Marinate the Chicken: Place 1.5 pounds (about 680g) of chicken tenderloins in a resealable plastic bag or shallow dish. Pour the buttermilk mixture over the chicken, making sure every piece is fully submerged. Seal or cover and refrigerate for at least 4 hours—or ideally overnight (up to 24 hours). This extended soak ensures maximum tenderness and flavor infusion.
- Prep the Breading Station: Set up three separate bowls:
- Bowl 1: 1 cup all-purpose flour mixed with 1 tablespoon ranch seasoning, ½ teaspoon garlic powder, ½ teaspoon onion powder, ½ teaspoon paprika, salt, and pepper.
- Bowl 2: 2 large eggs beaten with 1 tablespoon water or milk.
- Bowl 3: 1.5 cups panko breadcrumbs (seasoned with another 1–2 teaspoons of ranch mix for added flavor).
- Dredge the Chicken: Remove one piece of chicken from the buttermilk marinade, letting excess drip off. Dredge it first in the seasoned flour, shaking off any excess. Then dip into the egg wash, allowing excess to run off. Finally, coat thoroughly in the panko breadcrumbs, pressing gently to help the crumbs adhere. Place on a wire rack or plate and repeat for all pieces. For extra crunch, return the breaded tenders to the buttermilk and then back through the breadcrumbs again (double breading).
- Rest Before Frying: Allow the coated tenders to rest for 10–15 minutes. This helps the coating set and reduces shedding during frying.
- Heat the Oil: In a large skillet or Dutch oven, pour enough oil to reach a depth of about ½ inch. Heat over medium-high heat until it reaches 350°F (175°C). Use a deep-fry thermometer for accuracy; too hot and the outside burns before the inside cooks, too cool and the tenders will be greasy.
- Fry the Tenders: Carefully place 3–4 tenders into the hot oil without overcrowding. Fry for 3–4 minutes per side, or until golden brown and the internal temperature reaches 165°F (74°C). Flip once halfway through. Transfer to a wire rack set over a baking sheet to drain—this keeps them crispy. Avoid paper towels if possible, as they can trap steam and soften the crust.
- Keep Warm: If cooking in batches, place finished tenders in a single layer on a wire rack in a warm oven (around 200°F / 95°C) while you finish the rest.
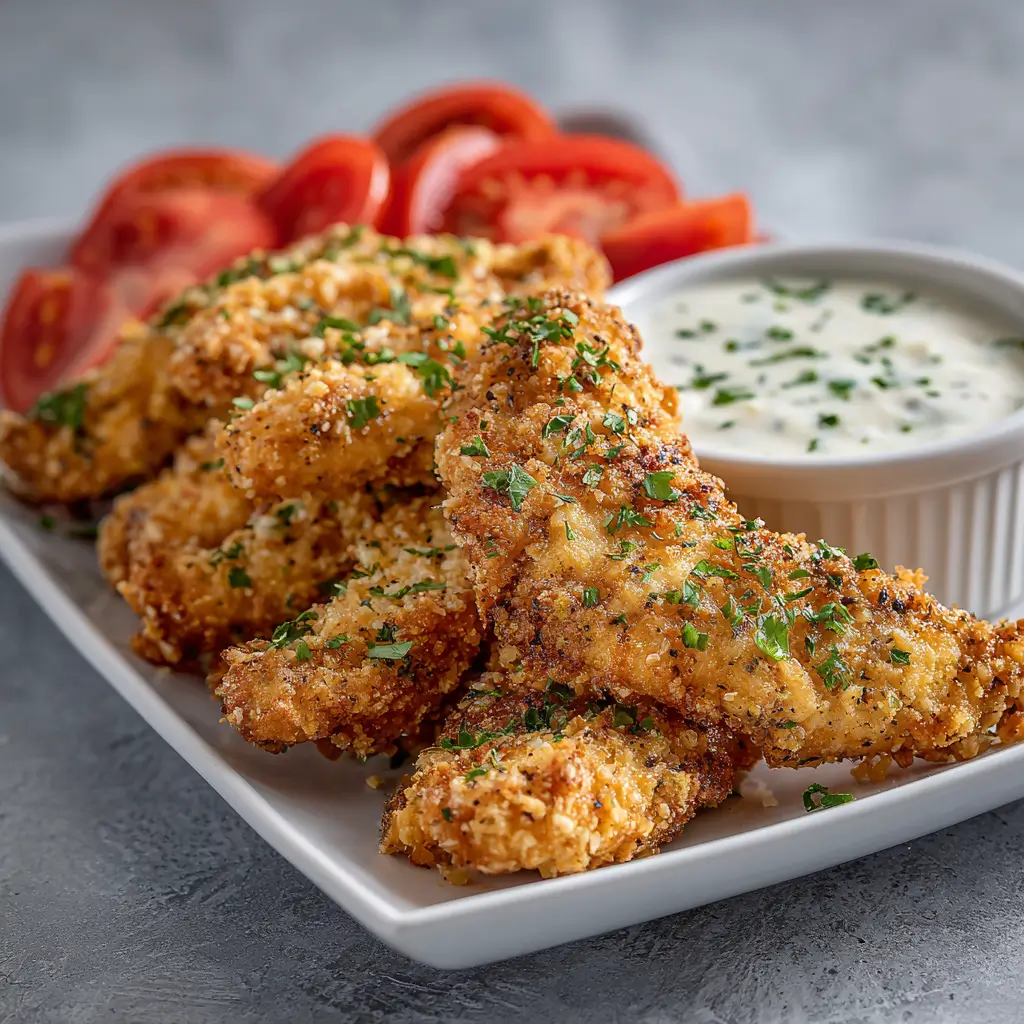
- Serve Immediately: Serve hot with your favorite dipping sauces such as blue cheese, honey mustard, barbecue, or extra ranch dressing.
Tips for Success: Expert Advice for Flawless Chicken Tenders
- Don’t Skip the Marinating Time: While 30 minutes might seem tempting, longer marination (at least 4 hours) makes a dramatic difference in juiciness and flavor penetration.
- Use Cold Buttermilk and Keep Chicken Chilled: Cold ingredients help prevent premature cooking and ensure even texture.
- Double Coating = Extra Crunch: Repeating the wet-dry-wet-dry process adds thickness and crunch, perfect for those who love a hearty crust.
- Consistent Oil Temperature Is Key: Monitor the oil closely. Adjust heat as needed to maintain 350°F throughout frying. Adding too many tenders at once drops the temperature drastically.
- Pat Dry Before Breading (Optional): After marinating, lightly patting the chicken dry with paper towels can improve breading adhesion, though it’s not always necessary.
- Season Every Layer: Don’t rely solely on the marinade—seasoning the flour, egg, and breadcrumbs ensures flavor in every bite.
- Avoid Overcrowding the Pan: Frying too many tenders at once lowers oil temperature and leads to soggy results.
- Bake Option for Healthier Version: Preheat oven to 400°F (200°C). Spray breaded tenders with cooking spray or brush lightly with oil. Bake on a parchment-lined or greased wire rack for 18–22 minutes, flipping halfway.
Variations and Customizations: Make It Your Own
One of the best things about Buttermilk Ranch Chicken Tenders is how easily they adapt to different tastes and dietary needs. Here are some creative twists to try:
- Spicy Ranch Kick: Add 1 teaspoon cayenne pepper or 1 tablespoon hot sauce to the buttermilk marinade. Serve with cooling ranch or avocado crema.
- Gluten-Free Version: Substitute regular flour with gluten-free all-purpose blend and use certified gluten-free panko or crushed gluten-free crackers.
- Keto-Friendly Option: Replace breadcrumbs with crushed pork rinds or almond flour. Use a keto-compliant ranch seasoning (check labels for sugar content).
- Baked or Air-Fried Tenders: For a lighter version, bake at 400°F for 20 minutes or air fry at 380°F for 10–12 minutes, flipping halfway. Lightly mist with oil for crispiness.
- Herb-Infused Breading: Mix fresh chopped herbs like rosemary, thyme, or chives into the breadcrumbs for an aromatic upgrade.
- Cheesy Crust: Stir grated Parmesan or Romano cheese into the panko for a rich, savory crust.
- Smoky Flavor Boost: Add smoked paprika or liquid smoke to the marinade for a campfire-style twist.
- Honey-Glazed Finish: Toss freshly fried tenders in a mixture of melted butter, honey, and a pinch of cayenne for a sweet-spicy finish.
- Buffalo Ranch Fusion: Toss cooked tenders in buffalo sauce after frying, then drizzle with ranch for a bold flavor combo.
- Kid-Friendly Shapes: Cut chicken into smaller strips or fun shapes for picky eaters. Pair with smiley-face fries and yogurt-based dips.
Health Considerations and Nutritional Value
While traditionally fried chicken tenders aren’t considered a health food, there are ways to make them part of a balanced diet. Let’s break down the nutritional aspects:
Nutritional Highlights (per serving, approx. 4 oz / 115g, fried):
- Calories: ~300–350 kcal
- Protein: ~25–30g (excellent source)
- Fat: ~15–20g (varies based on oil absorption)
- Carbohydrates: ~20–25g (mostly from breading)
- Sodium: ~600–900mg (can be reduced by using low-sodium seasonings)
Health Benefits:
- High-quality protein supports muscle repair and satiety.
- Buttermilk contains probiotics and calcium, aiding digestion and bone health.
- Ranch herbs like dill and parsley offer antioxidants and anti-inflammatory properties.
Healthier Modifications:
- Baking or Air Frying: Reduces fat content by up to 50% compared to deep frying.
- Whole Wheat or Oat Coating: Increases fiber and nutrients.
- Reduced-Sodium Seasoning: Helps manage blood pressure.
- Portion Control: Serve with large portions of vegetables or salad to balance the meal.
- Homemade Ranch Dressing: Avoid preservatives and excess sugar found in bottled versions.
Note: Those with lactose intolerance should be cautious with buttermilk, though fermentation reduces lactose levels. Lactose-free alternatives like kefir or yogurt-thinned plant milk can be substituted with moderate success.
Ingredients
- 1.5 lbs (680g) chicken tenderloins (or boneless, skinless chicken breasts cut into strips)
- 2 cups cold buttermilk
- ¼ cup ranch seasoning mix (homemade or store-bought), divided
- 1 tsp salt, plus more to taste
- ½ tsp freshly ground black pepper
- 1 clove garlic, minced (optional)
- 1 cup all-purpose flour (or gluten-free substitute)
- ½ tsp garlic powder
- ½ tsp onion powder
- ½ tsp paprika
- 2 large eggs
- 1 tbsp water or milk
- 1.5 cups panko breadcrumbs (or seasoned crumbs)
- Vegetable, canola, or peanut oil (for frying, about 1–2 cups)
Optional for serving: ranch dressing, honey mustard, celery sticks, carrot sticks, coleslaw, waffle fries, or a lemon wedge.
Directions
- In a mixing bowl, combine buttermilk, 3 tablespoons of ranch seasoning, 1 tsp salt, black pepper, and minced garlic. Whisk well.
- Add chicken tenders to the mixture, ensuring they are completely covered. Cover and refrigerate for 4 to 24 hours.
- Set up a breading station: In bowl 1, mix flour, 1 tbsp ranch seasoning, garlic powder, onion powder, paprika, salt, and pepper. In bowl 2, beat eggs with water. In bowl 3, combine panko with 1–2 tsp ranch seasoning.
- Remove chicken from marinade and let excess drip off. Dredge each piece in flour, then egg wash, then panko, pressing crumbs to adhere. Place on a wire rack and rest for 10–15 minutes.
- Heat oil in a heavy skillet to 350°F. Fry tenders in batches for 3–4 minutes per side until golden and internal temperature reaches 165°F.
- Transfer to a wire rack to drain. Repeat with remaining tenders.
- Serve immediately with your favorite sides and dips.
FAQ
Q: Can I make these ahead of time?
A: Yes! Bread and marinate up to 24 hours in advance. You can also fully cook and reheat in an oven or air fryer at 375°F for 5–8 minutes to restore crispness.
Q: Can I freeze Buttermilk Ranch Chicken Tenders?
A: Absolutely. Freeze uncooked breaded tenders on a tray, then transfer to a freezer bag. Cook from frozen—add 1–2 minutes to frying time. Cooked tenders can be frozen and reheated, though texture may soften slightly.
Q: Why did my breading fall off?
A: Common causes include not drying the chicken after marinating, skipping the resting step, or oil not being hot enough. Ensure each coating adheres properly and maintain oil temperature.
Q: Can I use Greek yogurt instead of buttermilk?
A: Yes. Thin Greek yogurt with a little milk or water to match buttermilk consistency. It provides similar tang and tenderizing effect.
Q: Are store-bought ranch packets high in sodium?
A: Many are. Check labels or make your own with dried herbs and spices to control salt content.
Q: What’s the best oil for frying chicken tenders?
A: Peanut, canola, or vegetable oil—all have high smoke points and neutral flavors. Avoid olive oil for deep frying due to low smoke point and strong taste.
Summary
Buttermilk Ranch Chicken Tenders combine the tangy tenderness of buttermilk-marinated chicken with the savory goodness of ranch seasoning, delivering a crispy, juicy, and deeply flavorful dish perfect for any occasion. Whether fried, baked, or air-fried, these tenders are endlessly customizable and loved by kids and adults alike.