
Introduction
Cheesy Pull-Apart Garlic Bread is a warm, gooey, and flavorful dish that has won hearts worldwide. Whether served as a side dish, appetizer, or a stand-alone snack, its irresistible combination of soft bread, melted cheese, garlic butter, and herbs makes it a favorite for any occasion. This dish is perfect for sharing, bringing people together around a comforting, cheesy delight that can be enjoyed by tearing off bite-sized pieces infused with rich, savory flavors. The appeal of pull-apart bread lies in its simplicity, yet its indulgent taste makes it feel like a gourmet treat.
The History of Cheesy Pull-Apart Garlic Bread
The origins of garlic bread itself can be traced back to ancient Rome, where people flavored bread with garlic and olive oil. However, the modern version we know today evolved from Italian bruschetta and French baguettes slathered in butter and garlic. Cheesy pull-apart bread is a more recent evolution, likely emerging in the United States as a fusion of garlic bread and cheesy comfort foods. It became popular in the late 20th century as an easy-to-make, crowd-pleasing dish, especially for parties, game nights, and family dinners. The concept of pull-apart bread also connects to monkey bread, a sweet, sticky treat made by baking small dough pieces together in a loaf. This cheesy, savory adaptation takes the same concept but enhances it with bold garlic flavors and melty cheese.
Ingredients Breakdown
- Bread: A crusty yet soft bread like sourdough, French bread, or an Italian loaf works best. The bread should be firm enough to hold its shape when cut but soft inside for the perfect balance of texture.
- Butter: Unsalted butter is preferred, allowing control over the saltiness while enhancing the rich, creamy texture of the garlic spread.
- Garlic: Fresh minced garlic is the key to an aromatic and robust garlic flavor, but garlic powder can also be used for a milder taste.
- Cheese: Mozzarella provides that classic stretchy, melty texture, while cheddar adds sharpness. Parmesan brings a nutty, umami depth, making for a well-rounded cheesy experience.
- Herbs: Fresh parsley, thyme, or oregano enhance the flavor profile, but dried herbs work well, too. Basil can add an Italian flair, while rosemary brings an earthy touch.
- Olive Oil: A drizzle of extra virgin olive oil can enhance the richness and help distribute flavors evenly.
- Salt & Pepper: These simple seasonings enhance all the other ingredients, ensuring a well-balanced taste.
- Optional Additions: Red pepper flakes for heat, bacon bits for extra savory goodness, or even caramelized onions for a slightly sweet contrast.
Step-by-Step Recipe
Step 1: Preheat and Prepare the Bread
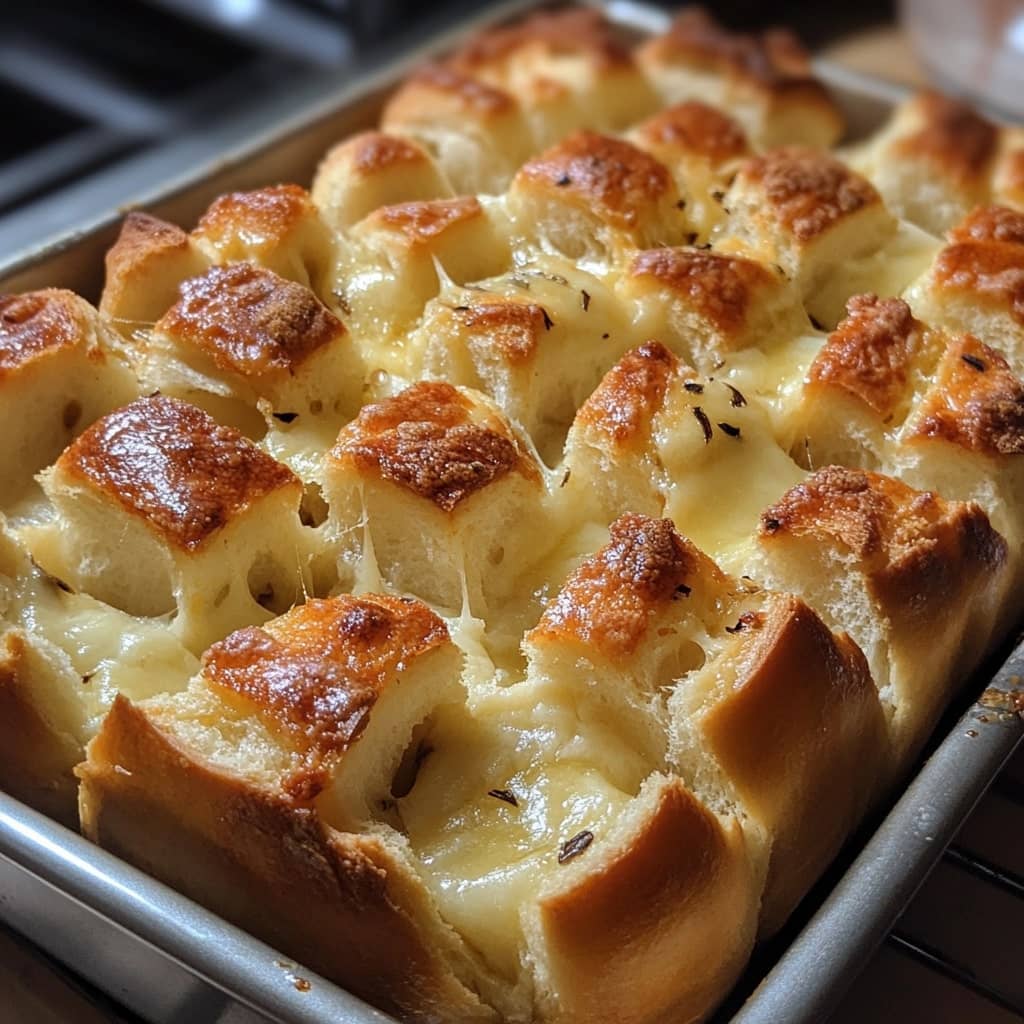
Preheat your oven to 375°F (190°C). Place the loaf of bread on a cutting board and, using a sharp serrated knife, make deep diagonal cuts across the bread, stopping just before the bottom so the loaf stays intact. Repeat the process in the opposite direction to create a crosshatch pattern, forming small squares that are easy to pull apart.
Step 2: Make the Garlic Butter
In a small saucepan or microwave-safe bowl, melt the butter. Stir in the minced garlic, a pinch of salt, black pepper, and finely chopped parsley. Let it sit for a few minutes to allow the garlic to infuse into the butter fully. If desired, a bit of olive oil can be added for extra richness.
Step 3: Stuff the Bread
Carefully separate the cut sections of the bread and brush or drizzle the garlic butter mixture into the crevices. Ensure the mixture gets deep into the cuts so every piece is flavored. Next, take shredded mozzarella, cheddar, and Parmesan cheese and stuff them generously between the bread squares. Press the cheese in to make sure it’s evenly distributed for a gooey, cheesy pull in every bite.
Step 4: Wrap and Bake
Wrap the stuffed bread loosely in aluminum foil, leaving the top slightly exposed. Place it on a baking sheet and bake for 15 minutes. After that, uncover the top and bake for another 10 minutes or until the cheese is fully melted and the top is golden and crispy.
Step 5: Serve and Enjoy
Remove the bread from the oven and let it sit for a minute before transferring it to a serving platter. Sprinkle with extra chopped parsley or Parmesan for a finishing touch. Serve immediately while hot and gooey for the best experience.
Tips for the Perfect Cheesy Pull-Apart Garlic Bread
- Use a firm yet soft loaf to ensure it holds up to the fillings without becoming too chewy.
- Melt the butter with garlic before applying so the flavor infuses deeply.
- Stuff cheese generously into all the cuts to maximize gooeyness in every bite.
- Cover with foil while baking to allow even melting, then uncover to crisp up the top.
- Serve fresh for the best texture, but if needed, reheat in the oven rather than the microwave to maintain crispiness.
Variations and Customizations
- Spicy Kick: Add crushed red pepper flakes or chopped jalapeños for a fiery touch.
- Meaty Upgrade: Add cooked bacon bits, pepperoni slices, or crumbled sausage for extra flavor.
- Gourmet Touch: Use gruyere or gouda cheese for a richer, more complex taste.
- Vegan Version: Use dairy-free butter, plant-based cheese, and a garlic-infused olive oil mix.
- Herb Explosion: Experiment with rosemary, thyme, or basil to enhance the aroma and depth of flavor.
- Sweet & Savory: A drizzle of honey with gorgonzola cheese can add a unique twist to the traditional recipe.
Health Considerations and Nutritional Value
While undeniably indulgent, Cheesy Pull-Apart Garlic Bread can be modified to fit various dietary needs. Using whole wheat or gluten-free bread provides a healthier alternative, and replacing butter with olive oil reduces saturated fats. Choosing lower-fat cheeses can decrease overall calorie content, while adding vegetables like spinach or tomatoes can boost nutritional value. However, this dish remains high in carbs, fats, and sodium, so moderation is key when including it in a balanced diet.
Frequently Asked Questions (FAQ)
Can I make this ahead of time? Yes! You can prepare the bread with garlic butter and cheese, wrap it in foil, and refrigerate for up to 24 hours before baking.
How do I store leftovers? Wrap leftovers in foil and store them in the refrigerator for up to 3 days. Reheat in an oven at 350°F (175°C) until warm.
Can I freeze it? Yes! Assemble the bread, wrap it tightly in plastic wrap and foil, then freeze for up to a month. Bake directly from frozen, adding a few extra minutes.
What’s the best bread to use? A firm loaf like sourdough or a French baguette works best, as it holds up well to cutting and stuffing.
Can I use pre-shredded cheese? It’s best to shred cheese fresh, as pre-shredded cheese contains anti-caking agents that may affect melting.
Cheesy Pull-Apart Garlic Bread
Ingredients
Method
- Preheat the oven to 180°C/350°F.
- In a heatproof bowl, combine the butter, garlic, and salt, then melt in the microwave. Stir in the chopped parsley.
- Cut the bread diagonally into 2cm/1-inch diamond shapes, making sure not to cut all the way through the loaf.
- Using your fingers or a knife, gently open each crack and drizzle a teaspoon of the garlic butter into each section, then stuff a pinch of cheese into each. It may feel a bit tedious, but trust me, it’s totally worth it! Don’t worry about being too neat; some of the butter will naturally drip onto the crust, and that’s part of the charm.
- Brush any remaining butter over the surface of the bread.
- Wrap the loaf in foil and bake for 20 minutes until the cheese is mostly melted. Then, uncover and bake for an additional 5-10 minutes to crisp up the crust.
- Serve immediately. (See Note 1 for the best make-ahead methods.)