
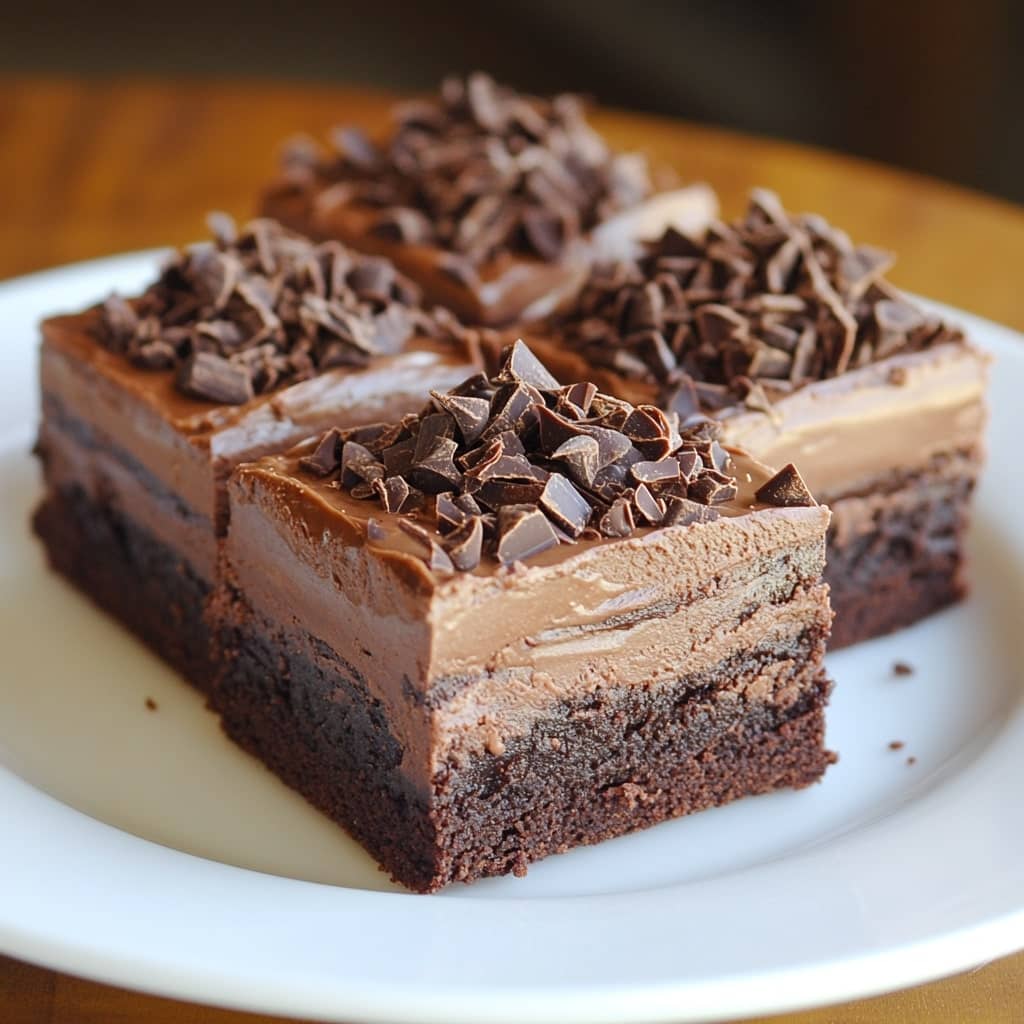
Chocolate mousse brownies are the ultimate indulgent dessert, combining the dense richness of classic chocolate brownies with the airy, luxurious texture of chocolate mousse. This dessert is perfect for dinner parties, special occasions, or simply as a decadent treat to satisfy any chocolate lover’s cravings. The contrast in textures—from the fudgy base to the silky mousse topping—makes each bite an experience of its own. Whether served chilled for a refreshing treat or at room temperature for a creamier texture, chocolate mousse brownies are sure to impress.
The History of Chocolate Mousse Brownies
The concept of brownies dates back to the late 19th century in the United States, believed to have been created by accident or as a deliberate innovation for a dessert that was denser than cake but more tender than a cookie. Meanwhile, chocolate mousse originated in France in the 18th century, celebrated for its light, whipped texture and deeply chocolatey flavor. Combining these two iconic desserts is a more modern twist, likely becoming popular in the late 20th or early 21st century as home bakers and chefs alike began experimenting with layering textures and flavors in desserts. The fusion of brownies and mousse reflects a growing appreciation for contrast in culinary experiences—dense versus airy, rich versus light—all in one bite.
Ingredients Breakdown
For the Brownie Base: 1/2 cup (115g) unsalted butter, melted 1 cup (200g) granulated sugar 2 large eggs 1 teaspoon vanilla extract 1/3 cup (40g) unsweetened cocoa powder 1/2 cup (65g) all-purpose flour 1/4 teaspoon salt 1/4 teaspoon baking powder Optional: 1/2 cup (90g) chocolate chips or chopped chocolate for extra fudginess
For the Chocolate Mousse: 1 cup (240ml) heavy whipping cream, cold 1 cup (175g) semi-sweet chocolate chips or chopped chocolate 2 tablespoons (30g) unsalted butter 2 large egg yolks (use pasteurized eggs for safety) 2 tablespoons granulated sugar 1/2 teaspoon vanilla extract Pinch of salt
Step-by-Step Recipe
Preheat your oven to 350°F (175°C) and line an 8×8-inch (20×20 cm) baking pan with parchment paper, allowing some overhang for easy removal. Start by making the brownie base: In a large bowl, whisk together the melted butter and sugar until smooth and slightly glossy. Beat in the eggs one at a time, followed by the vanilla extract. In a separate bowl, combine the cocoa powder, flour, salt, and baking powder. Gradually mix the dry ingredients into the wet ingredients until just combined. Stir in the chocolate chips if using. Spread the batter evenly into the prepared pan and bake for 20-25 minutes or until a toothpick inserted in the center comes out with a few moist crumbs. Allow to cool completely in the pan on a wire rack. While the brownies cool, prepare the chocolate mousse: In a small saucepan, melt the chocolate and butter together over low heat, stirring until smooth. Let cool slightly. In a separate bowl, whisk the egg yolks with sugar until pale and slightly thickened. Slowly stir the melted chocolate mixture into the egg mixture, whisking constantly to avoid curdling. Stir in the vanilla and a pinch of salt. In a chilled bowl, whip the heavy cream until stiff peaks form. Gently fold the whipped cream into the chocolate mixture in two additions, being careful not to deflate the mousse. Once the brownies are completely cool, spread the mousse evenly on top. Chill in the refrigerator for at least 2 hours, preferably overnight, to set. Once set, use the parchment paper to lift the brownies out of the pan and cut into squares using a sharp knife dipped in hot water for clean cuts.
Tips for the Perfect Chocolate Mousse Brownies
Use high-quality chocolate for the best flavor, especially in the mousse. Let the brownie layer cool completely before adding the mousse to avoid melting it. For a cleaner mousse texture, strain the melted chocolate mixture before folding in the whipped cream. Use a stand mixer or electric hand mixer for whipping cream to achieve a stable mousse. Chill the brownies thoroughly to allow the mousse to set properly—overnight is ideal. When slicing, always clean the knife between cuts for neat squares. For an extra elegant touch, dust the top with cocoa powder, chocolate shavings, or a drizzle of chocolate ganache.
Variations and Customizations
You can make several exciting variations of chocolate mousse brownies to suit different tastes. Try using dark chocolate or milk chocolate instead of semi-sweet for the mousse. Add a layer of raspberry preserves between the brownie and mousse for a fruity twist. Incorporate a splash of liqueur like Baileys, Kahlua, or Grand Marnier into the mousse for an adult version. Use a gluten-free flour blend to make the recipe suitable for those with gluten sensitivities. For a dairy-free version, substitute coconut cream for the whipping cream and use dairy-free chocolate. Add a crunchy element by sprinkling chopped nuts or cookie crumbs over the mousse layer before chilling.
Health Considerations and Nutritional Value
Chocolate mousse brownies are undeniably rich, and while they’re best enjoyed in moderation, there are ways to adjust the recipe for better nutritional balance. Using dark chocolate (70% cacao or higher) provides antioxidants and less sugar. Replacing some of the sugar with a natural sweetener like coconut sugar or stevia can reduce the glycemic impact. Choosing a whole-grain flour or almond flour can increase the fiber content. Each serving (assuming 16 squares) typically contains approximately 250-350 calories, with about 20g of sugar and 15g of fat, depending on the specific ingredients used. For those watching cholesterol or saturated fat intake, using egg substitutes or lower-fat dairy products may help lighten the recipe slightly, though the texture may be affected. Individuals with egg allergies should use egg-free mousse alternatives such as avocado-based mousse or aquafaba (whipped chickpea water) for the topping.
FAQ
Can I make these ahead of time? Yes, chocolate mousse brownies are actually better when made ahead—prepare them the night before for best results. How long do they last in the fridge? Store in an airtight container in the refrigerator for up to 4-5 days. Can I freeze chocolate mousse brownies? Yes, freeze them after the mousse has set. Wrap tightly in plastic wrap and foil, then freeze for up to 2 months. Thaw in the refrigerator overnight before serving. Can I use boxed brownie mix? Absolutely—use your favorite mix for the brownie layer to save time, and then prepare the mousse as directed. Do I need to cook the mousse? This recipe uses egg yolks, so using pasteurized eggs is recommended. If you’re concerned, opt for an egg-free mousse recipe.
Chocolate Mousse Brownies Recipe
Ingredients
Method
- Preheat the oven to 350°F (175°C) and line an 8×8-inch (20×20 cm) baking pan with parchment paper, allowing some overhang for easy removal.
- In a large mixing bowl, combine the melted butter, granulated sugar, eggs, and vanilla extract. Whisk until the mixture is smooth and well blended.
- Sift in the cocoa powder, flour, salt, and baking powder. Using a spatula, gently fold the dry ingredients into the wet mixture until just combined—avoid overmixing to keep the brownies tender.
- Pour the batter into the lined baking pan and use a spatula to smooth out the surface evenly.
- Bake for 20–25 minutes, or until a toothpick inserted into the center comes out with a few moist crumbs. Allow the brownie layer to cool completely in the pan before moving on.
- In a small saucepan, heat the milk until it is steaming but not boiling. Pour it over the finely chopped semisweet chocolate placed in a heatproof bowl. Let the mixture sit for about 2 minutes, then stir until the chocolate is melted and silky smooth. Allow it to cool to room temperature, remaining fluid but not warm.
- In a separate chilled bowl, whip the heavy whipping cream with the powdered sugar until soft peaks form.
- Carefully fold the cooled chocolate mixture into the whipped cream, mixing gently to preserve the airy texture. Continue folding until the mousse is smooth and fully combined.
- Spread the mousse evenly over the cooled brownie base. Place the pan in the refrigerator and chill for at least 2 hours, or until the mousse is firm and set.
- Put the chopped semisweet chocolate into a heatproof bowl. In a small saucepan, heat the heavy cream just until it begins to simmer. Pour the hot cream over the chocolate and let it sit for 2–3 minutes. Stir until the ganache becomes smooth, glossy, and fully blended.
- Pour the ganache over the mousse layer and use an offset spatula to spread it evenly to the edges.
- Refrigerate the assembled dessert for another hour, or until the ganache is fully set and firm to the touch.