Dark Chocolate Halloween Cookies: A Spooktacular Treat for the Season
When the autumn leaves fall and the air turns crisp, it’s time to embrace the magic of Halloween with a batch of rich, decadent Dark Chocolate Halloween Cookies. These fudgy, melt-in-your-mouth delights are not only perfect for satisfying sweet cravings but also ideal for holiday parties, trick-or-treat giveaways, or cozy nights by the fireplace. Packed with deep cocoa flavor and customizable with festive decorations, these cookies strike the perfect balance between indulgence and seasonal fun. Whether you’re a seasoned baker or a beginner looking to impress, this recipe will guide you through every step to create show-stopping treats that capture the spirit of the season.
The History of Halloween Treats and Chocolate Delights
Halloween has long been associated with communal feasting and symbolic foods. Originating from the ancient Celtic festival of Samhain, when people lit bonfires and wore costumes to ward off spirits, food played a central role in rituals and offerings. Over centuries, traditions evolved—especially after merging with Christian observances like All Saints’ Day—and eventually gave rise to modern customs such as trick-or-treating. By the 20th century, candy became synonymous with Halloween, particularly chocolate, which had gained popularity due to its luxurious taste and mass production. Today, dark chocolate stands out not just for its bold flavor but also for its perceived health benefits and gourmet appeal. These Dark Chocolate Halloween Cookies pay homage to this evolution—combining historical reverence for seasonal sweets with contemporary baking techniques and aesthetic flair. They’re more than just dessert; they’re edible art infused with tradition.
Ingredients Breakdown: Why Each Component Matters
The success of your Dark Chocolate Halloween Cookies hinges on selecting high-quality ingredients and understanding their roles in creating texture, flavor, and structure:
- Unsweetened Cocoa Powder (Dutch-processed preferred): Provides intense chocolate flavor without added sugar. Dutch-processed cocoa is less acidic and offers a smoother, richer taste compared to natural cocoa.
- Dark Chocolate (70% cacao or higher): Chopped into chunks or used as chips, this ingredient adds depth and melty pockets of chocolate in every bite. Higher cacao content enhances bitterness, balancing sweetness.
- All-Purpose Flour: Offers structure while keeping the cookies tender. For gluten-free versions, a 1:1 substitute blend works well.
- Baking Soda and Baking Powder: A dual leavening system ensures the cookies rise slightly while maintaining a dense, chewy center.
- Salted Butter: Adds richness and promotes browning during baking. The slight saltiness enhances overall flavor complexity.
- Brown Sugar and Granulated Sugar: Brown sugar contributes moisture and chewiness due to its molasses content; granulated sugar aids in spreading and crisp edges.
- Large Eggs: Bind ingredients together and contribute to the cookie’s structure and softness.
- Vanilla Extract: Enhances aroma and rounds out the chocolate flavor profile.
- Espresso Powder (optional): Deepens chocolate notes without adding coffee flavor—highly recommended for true chocolate lovers.
- Festive Add-Ins (sprinkles, candy eyes, orange & white chocolate drizzle): Perfect for Halloween customization, allowing creative expression.
Each ingredient is chosen not only for function but also for synergy—working together to produce a cookie that’s both deeply chocolatey and delightfully textured.
Step-by-Step Recipe: Crafting the Perfect Batch
- Preparation: Preheat your oven to 350°F (175°C). Line two large baking sheets with parchment paper or silicone mats to prevent sticking.
- Mix Dry Ingredients: In a medium bowl, whisk together 1 ¾ cups all-purpose flour, ¾ cup unsweetened Dutch-process cocoa powder, ½ teaspoon baking soda, ½ teaspoon baking powder, and ¼ teaspoon salt. Set aside.
- Cream Butter and Sugars: In a large mixing bowl, beat ¾ cup (1.5 sticks) softened salted butter with ¾ cup packed light brown sugar and ½ cup granulated sugar using an electric mixer until light and fluffy (about 2–3 minutes).
- Add Wet Ingredients: Beat in 1 large egg and 1 teaspoon vanilla extract until fully incorporated. Then add a second egg and mix again until smooth.
- Incorporate Dry Mixture: Gradually add the dry ingredients to the wet mixture on low speed, mixing just until combined. Avoid overmixing to keep cookies tender.
- Stir in Chocolate: Fold in 1 ½ cups chopped dark chocolate or high-quality dark chocolate chips using a spatula. Optionally, add ½ teaspoon espresso powder at this stage for enhanced flavor.
- Chill the Dough (Recommended): Cover the dough and refrigerate for at least 1 hour (or up to 72 hours). Chilling prevents excessive spreading and intensifies flavors.
- Scoop and Shape: Use a cookie scoop or tablespoon to portion dough into 1.5-inch balls. Place them 2 inches apart on prepared baking sheets.
- Bake: Bake one sheet at a time for 10–12 minutes, until edges are set but centers remain soft. Do not overbake—cookies continue to firm as they cool.
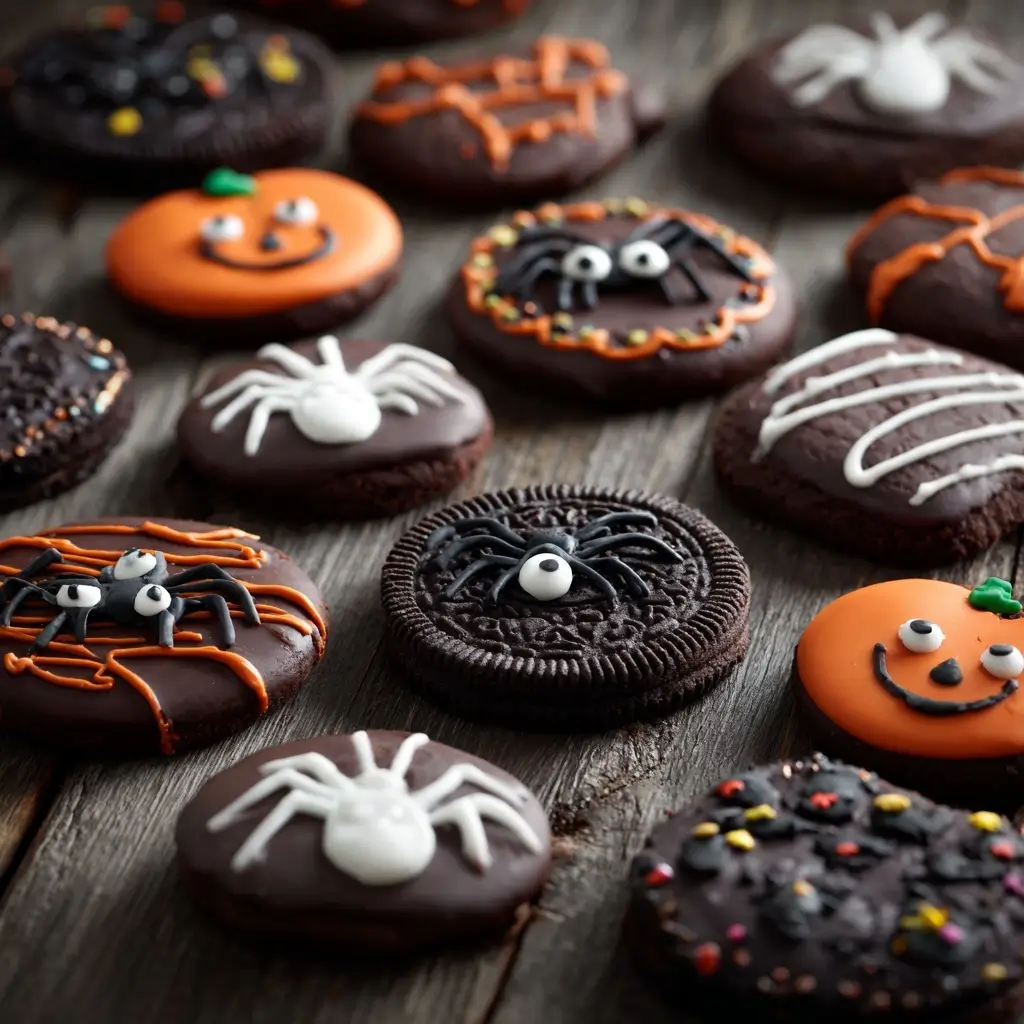
- Cool and Decorate: Let cookies cool on the baking sheet for 5 minutes before transferring to a wire rack. Once completely cooled, decorate with Halloween-themed elements like white chocolate drizzles, colored sprinkles, or candy eyes.
This method yields approximately 24–30 cookies, depending on size.
Tips for Baking Success
- Use Room Temperature Butter: Ensures even creaming and a uniform batter. Cold butter won’t blend smoothly, leading to lumpy dough.
- Don’t Skip the Chill: Refrigerating the dough improves texture and prevents flat, greasy cookies. It also allows flavors to meld.
- Measure Flour Accurately: Spoon flour into your measuring cup and level off—don’t scoop directly from the bag, which compacts the flour and leads to dry cookies.
- Watch Baking Time Closely: Oven temperatures vary. Start checking at 9 minutes. Slightly underbaked cookies are chewier and more delicious.
- Rotate the Pan Halfway: Promotes even baking, especially if your oven has hot spots.
- Double the Batch: These cookies freeze beautifully. Freeze unbaked dough balls on a tray, then transfer to a freezer bag. Bake straight from frozen—add 1–2 minutes to baking time.
- Decorate Creatively: Use melted white chocolate and food coloring to draw spiderwebs, ghosts, or pumpkins. Pipe with a zip-top bag or decorating pen for precision.
Variations and Customizations
These Dark Chocolate Halloween Cookies are a versatile canvas for creativity. Try these fun twists:
- Pumpkin Spice Version: Add 1 teaspoon pumpkin pie spice to the dry ingredients for a fall-inspired twist.
- Mint Chocolate: Stir in ½ teaspoon peppermint extract and use dark mint chocolate chunks for a refreshing contrast.
- Nutty Crunch: Fold in ½ cup chopped toasted pecans or walnuts for added texture and earthy flavor.
- Gluten-Free: Substitute with a quality gluten-free flour blend containing xanthan gum.
- Vegan Option: Replace butter with vegan butter, eggs with flax eggs (1 tbsp ground flax + 2.5 tbsp water per egg), and use dairy-free dark chocolate.
- Spooky Stuffed Cookies: Press a candy corn, gummy worm, or caramel center into each dough ball before baking for a surprise inside.
- Cookie Sandwiches: Pair two cookies with orange cream cheese frosting or marshmallow filling for a festive sandwich effect.
- Monster Mash Cookies: After cooling, glue on candy eyes with frosting and use red icing to draw “scars” or “stitches.”
You can also experiment with different types of dark chocolate—single-origin bars, smoked chocolate, or ruby chocolate for color variation.
Health Considerations and Nutritional Value
While these Dark Chocolate Halloween Cookies are undeniably indulgent, they do offer some nutritional advantages when enjoyed in moderation:
- Antioxidants from Dark Chocolate: High-cocoa chocolate contains flavonoids, which may support heart health and reduce inflammation.
- Lower Sugar Options: You can reduce sugar by ¼ cup total or use coconut sugar as a substitute for a lower glycemic index.
- Healthy Fats: Dark chocolate and butter provide satiating fats, though saturated fat content should be considered for those monitoring intake.
- Portion Control: Making smaller cookies helps manage serving sizes. Aim for one or two as a treat rather than overindulging.
- Dietary Modifications: As mentioned, vegan, gluten-free, and reduced-sugar versions make this recipe adaptable for various dietary needs.
Average nutrition per cookie (based on 24 cookies, no add-ins):
- Calories: ~180
- Total Fat: 10g (6g saturated)
- Carbohydrates: 22g (14g sugar, 1g fiber)
- Protein: 2g
- Cholesterol: 30mg
- Sodium: 85mg
Pairing these cookies with a glass of almond milk or herbal tea can balance the richness and make for a lighter dessert experience.
Ingredients
- 1 ¾ cups (220g) all-purpose flour
- ¾ cup (75g) unsweetened Dutch-process cocoa powder
- ½ teaspoon baking soda
- ½ teaspoon baking powder
- ¼ teaspoon salt
- ¾ cup (1.5 sticks / 170g) salted butter, softened
- ¾ cup (150g) packed light brown sugar
- ½ cup (100g) granulated sugar
- 2 large eggs, room temperature
- 1 teaspoon pure vanilla extract
- 1 ½ cups (270g) chopped dark chocolate (70% cacao or higher) or dark chocolate chips
- ½ teaspoon espresso powder (optional, but recommended)
- Festive decorations (e.g., white chocolate, candy eyes, Halloween sprinkles)
Directions
- Preheat oven to 350°F (175°C). Line baking sheets with parchment paper.
- In a medium bowl, whisk together flour, cocoa powder, baking soda, baking powder, and salt. Set aside.
- In a large bowl, cream softened butter, brown sugar, and granulated sugar until light and fluffy (2–3 minutes).
- Beat in eggs one at a time, followed by vanilla extract. Mix until smooth.
- Gradually add dry ingredients to wet mixture on low speed until just combined.
- Fold in chopped dark chocolate and espresso powder (if using) with a spatula.
- Cover dough and refrigerate for at least 1 hour (up to 3 days).
- Roll dough into 1.5-inch balls and place 2 inches apart on baking sheets.
- Bake for 10–12 minutes until edges are set and centers are soft.
- Cool on baking sheet for 5 minutes, then transfer to wire rack to cool completely.
- Once cooled, decorate as desired for Halloween flair.
- Store in an airtight container at room temperature for up to 5 days, or freeze for longer storage.
FAQ
Can I make these cookies ahead of time?
Yes! The dough can be chilled for up to 3 days or frozen for up to 3 months. You can also bake and freeze the cookies—just thaw at room temperature and refresh in a warm oven if needed.
Why did my cookies spread too much?
Common causes include warm dough, melted butter, or insufficient flour. Always chill the dough and measure flour accurately. Also, avoid placing dough on hot baking sheets.
Can I use natural cocoa instead of Dutch-process?
Yes, but the color may be lighter and the flavor slightly more acidic. For best results, stick with Dutch-process if possible.
Are these cookies suitable for kids?
Absolutely! While they have a rich chocolate taste, most children love them. Adjust sweetness slightly if needed, and let kids help with decorating—it’s a fun family activity.
How do I make them extra fudgy?
Underbake slightly (closer to 10 minutes), increase dark chocolate content, or add an extra egg yolk for richness.
Can I ship these as gifts?
Yes! Pack cooled cookies in a sturdy box with parchment between layers. Include silica packets to absorb moisture and ensure freshness during transit.
Summary
Dark Chocolate Halloween Cookies are rich, fudgy, and bursting with intense cocoa flavor, making them the ultimate seasonal treat. Easy to customize and perfect for sharing, they bring joy and spookiness to any Halloween celebration.