Introduction
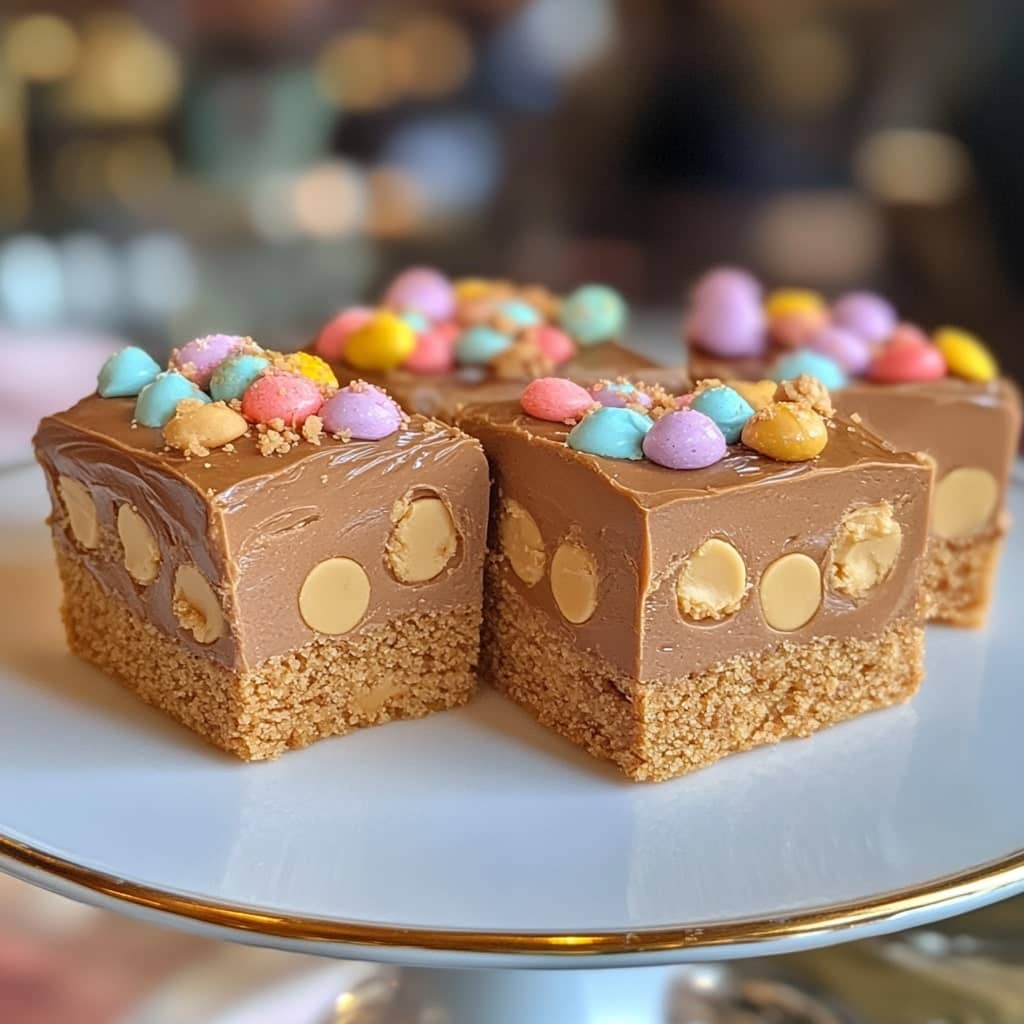
Disneyland is more than just a magical theme park filled with thrilling rides and enchanting characters—it’s also a place known for its iconic snacks and sweet treats. Among these beloved indulgences is a lesser-known but absolutely cherished confection: Disneyland Peanut Butter Squares. A decadent, creamy, chewy, and chocolatey dessert, these squares combine rich peanut butter with a luscious chocolate layer on top, capturing the hearts and taste buds of visitors from all over the world. With their irresistible texture and nostalgic flavor, Disneyland Peanut Butter Squares have become a fan favorite that transcends age and time, often prompting visitors to search for ways to recreate the magic at home.
The History of Disneyland Peanut Butter Squares
The origin of Disneyland Peanut Butter Squares can be traced back to the Main Street Confectionery, a haven of homemade goodies inside Disneyland. Over the decades, Disney’s culinary team has been crafting treats that reflect not only classic American flavors but also seasonal surprises and beloved staples. Peanut Butter Squares likely gained traction during the late 20th century when peanut butter desserts surged in popularity across the United States. Simple, satisfying, and made with everyday pantry staples, the treat embodies Disney’s knack for elevating ordinary ingredients into extraordinary experiences. They were originally made as an easy, no-bake treat for both cast members and guests, offering a bite-sized piece of magic that could be replicated in home kitchens. While the recipe has evolved slightly over time and varies across different Disney parks and media, the essential components—peanut butter, graham crackers, powdered sugar, and chocolate—have remained consistent, maintaining its nostalgic appeal.
Ingredients Breakdown
The beauty of Disneyland Peanut Butter Squares lies in their simplicity and accessibility. Here’s a breakdown of the core ingredients:
- Creamy Peanut Butter: The star of the show, peanut butter provides the rich, nutty base and smooth texture. Opt for a commercial, no-stir variety for consistency.
- Powdered Sugar: Adds sweetness while helping bind the peanut butter mixture into a dough-like consistency.
- Graham Cracker Crumbs: These add a subtle crunch and depth of flavor, balancing the creamy and sweet elements with a touch of toasted, honeyed notes.
- Butter: Melted unsalted butter enhances richness and helps combine all dry ingredients into a cohesive mixture.
- Semi-Sweet Chocolate Chips: Used to create the luscious chocolate topping, melted to perfection and spread evenly over the peanut butter base.
- Vanilla Extract (optional): Adds a touch of aromatic sweetness and enhances the overall flavor profile.
Step-by-Step Recipe
- Prepare the Pan: Line an 8×8 or 9×9 inch square baking dish with parchment paper or foil, leaving enough overhang on the sides for easy removal later. Lightly grease for easier release.
- Mix the Peanut Butter Base: In a large mixing bowl, combine 1 cup of creamy peanut butter, 1/2 cup of melted unsalted butter, and 2 cups of powdered sugar. Stir until fully incorporated and smooth. Add 1 1/2 cups of graham cracker crumbs and a splash of vanilla extract (about 1 tsp, optional). Mix thoroughly until a thick, dough-like consistency forms.
- Press into the Pan: Transfer the peanut butter mixture into the prepared pan. Using a spatula or clean hands, press the mixture evenly and firmly into the pan to create a smooth, even layer.
- Make the Chocolate Topping: In a microwave-safe bowl or over a double boiler, melt 1 1/2 cups of semi-sweet chocolate chips with 1/4 cup of creamy peanut butter. Stir until smooth and glossy.
- Top the Squares: Pour the melted chocolate-peanut butter mixture over the peanut butter base. Use a spatula to spread it evenly to the edges.
- Chill: Place the pan in the refrigerator for at least 2 hours, or until the bars are completely set.
- Cut and Serve: Once chilled and firm, use the parchment paper overhang to lift the entire block from the pan. Cut into squares using a sharp knife, wiping the blade between cuts for clean edges.
Tips for the Perfect Disneyland Peanut Butter Squares
To ensure your squares turn out just like the ones served in the park, keep a few key tips in mind. First, use high-quality, fresh ingredients; the better the peanut butter and chocolate, the better the end result. Make sure to press the base firmly into the pan to avoid crumbling. For a more layered look, consider refrigerating the peanut butter layer for 10–15 minutes before adding the chocolate topping. To avoid cracks in the chocolate layer when slicing, let the squares sit at room temperature for 5–10 minutes before cutting. If you want perfect edges, dip your knife in hot water and dry it before each cut. These tips can make a significant difference in texture and presentation.
Variations and Customizations
Though the classic version is delightful, there are numerous ways to personalize your Peanut Butter Squares. Swap graham cracker crumbs for crushed digestive biscuits or crushed pretzels for a salty crunch. Use crunchy peanut butter instead of creamy for added texture. Add a layer of marshmallow fluff between the base and chocolate for a s’mores-inspired twist. Incorporate mini chocolate chips or chopped nuts into the base for extra richness. For a holiday version, top the chocolate with crushed candy canes or colored sprinkles. You can even experiment with different nut butters like almond or cashew if you’re catering to taste preferences or allergies. Vegan versions can be made using dairy-free butter and chocolate.
Health Considerations and Nutritional Value
Disneyland Peanut Butter Squares are undeniably indulgent, so it’s important to enjoy them in moderation. A single square can range from 250–350 calories depending on size and specific ingredients used. The dessert is high in fat and sugar, which contributes to its rich texture and flavor. Peanut butter provides some protein and healthy fats, while the chocolate offers antioxidants—but these benefits are outweighed by the sugar and calorie content if consumed excessively. Those with peanut allergies should exercise caution, and gluten-free graham crackers can be used for those with gluten sensitivities. For a healthier version, consider using natural peanut butter with no added sugar, substituting powdered sugar with a natural sweetener like stevia or monk fruit, and opting for dark chocolate with a high cocoa content.
FAQ
Q: Can I freeze Disneyland Peanut Butter Squares?
A: Yes, they freeze well! Just wrap individual squares in plastic wrap and store them in a sealed container for up to 3 months.
Q: Can I make these without graham crackers?
A: Absolutely. You can use crushed digestive biscuits, oat flour, or even almond meal as a substitute.
Q: How long do they last in the fridge?
A: They stay fresh for up to one week in an airtight container in the refrigerator.
Q: Can I use natural peanut butter?
A: You can, but the texture may be slightly more crumbly. You might need to add a little extra powdered sugar to help it bind.
Q: Is this the exact Disneyland recipe?
A: While this recipe is based on the flavors and texture of the Disneyland classic, Disney has not officially released the original, so this is a close, widely beloved replica.
DISNEYLAND PEANUT BUTTER SQUARES
Ingredients
Method
- Prepare the Baking Dish: Lightly coat a 9×13-inch glass baking dish with non-stick cooking spray to prevent sticking.
- Crush Graham Crackers for Garnish: Place 2 full graham cracker sheets in a resealable plastic bag and crush them into fine crumbs using a meat mallet or the bottom of a sturdy glass. Set the crumbs aside to use as a topping.
- Prepare the Peanut Butter Mixture: In a large mixing bowl, combine peanut butter, softened butter, vanilla extract, and a pinch of salt. Stir until smooth and creamy. Gradually add powdered sugar, mixing thoroughly until fully incorporated and a thick consistency is achieved.
- Melt the Chocolate: Place the chocolate chips and shortening in a microwave-safe bowl. Microwave in 30-second increments, stirring well between each interval, until the mixture is melted and smooth. Be careful not to overheat.
- Arrange 6 full graham cracker sheets in a single layer at the bottom of the prepared dish.
- Drizzle ⅓ of the melted chocolate over the crackers and spread it out evenly.
- Flatten the prepared peanut butter mixture with your hands and place it over the chocolate layer, covering the surface evenly.
- Pour another ⅓ of the melted chocolate over the peanut butter layer and spread it smoothly.
- Add a second layer of 6 more graham cracker sheets on top.
- Finish by pouring the remaining chocolate over the top layer and spreading it evenly across the surface.
- Add Topping & Chill: Sprinkle the reserved crushed graham cracker crumbs over the top layer. Place the dish in the refrigerator and chill for at least 1 hour, or until the dessert is fully set.
- Slice and Serve: Once firm, cut into squares and enjoy this rich, layered treat!