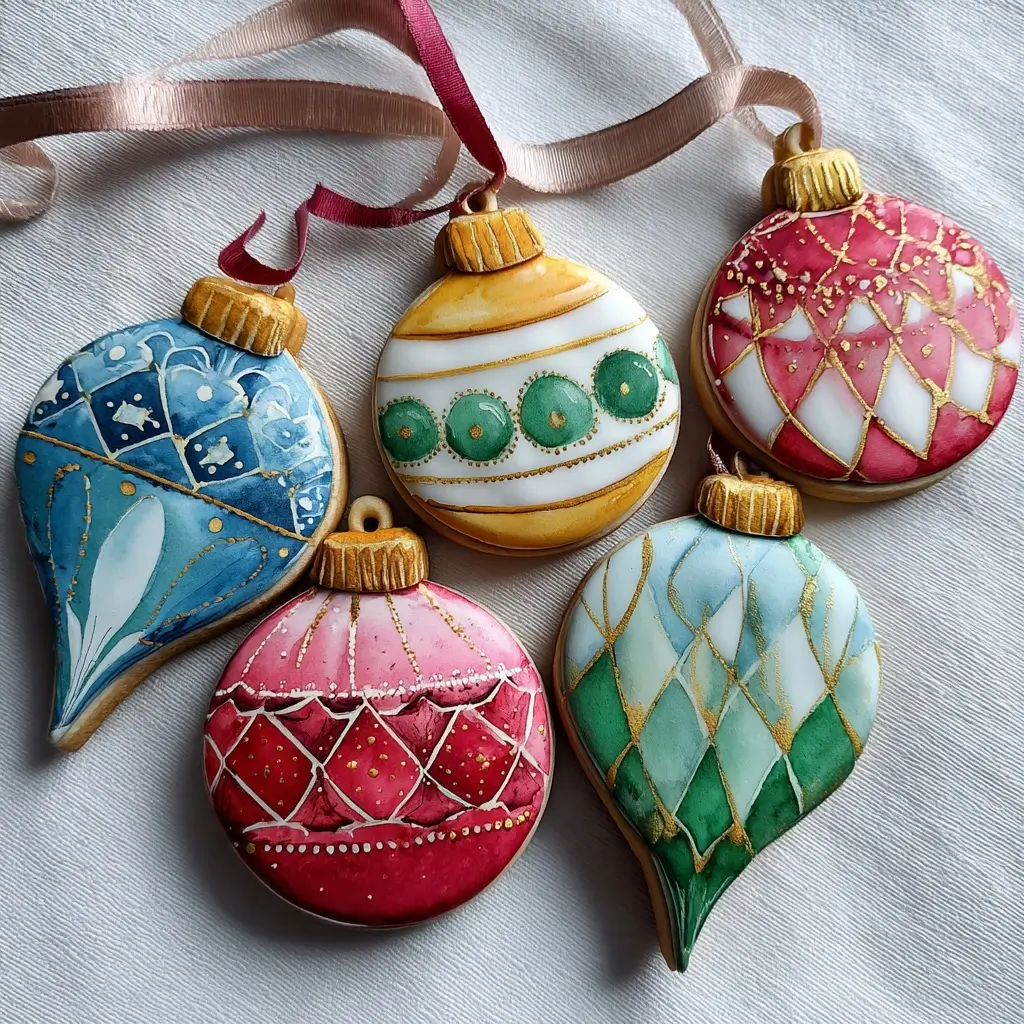
Watercolor Christmas Ornament Cookies: A Festive, Artistic Treat
The History of Watercolor Christmas Ornament Cookies
The tradition of baking festive holiday cookies dates back centuries, with roots in German and Scandinavian customs where families would gather to prepare elaborate sweets for Christmas celebrations. While classic sugar cookies have long been a staple on holiday tables, the concept of Watercolor Christmas Ornament Cookies is a modern culinary innovation that blends baking with edible artistry. Inspired by the delicate brushstrokes and translucent beauty of watercolor paintings, these cookies emerged as part of the growing trend toward decorated cookies as edible canvases.
In the early 2010s, cookie decorating surged in popularity thanks to social media platforms like Instagram, Pinterest, and YouTube. Artists and home bakers began experimenting with royal icing techniques, including flooding, marbling, and airbrushing. The “watercolor” effect—achieved by diluting food coloring and gently blending hues on dried royal icing—mirrored real watercolor painting and quickly became a favorite among creative bakers. The idea of shaping these beautifully painted cookies into ornaments was a natural evolution, combining the joy of cookie decorating with the tradition of handmade Christmas decorations.
Today, Watercolor Christmas Ornament Cookies are more than just treats—they’re edible heirlooms. Families bake them together, hang them on trees (with ribbon or edible laces), gift them in decorative boxes, or use them as personalized place settings during holiday dinners. These cookies represent not only seasonal cheer but also the fusion of culinary skill and artistic expression, making them one of the most visually stunning and emotionally meaningful desserts of the season.
Ingredients Breakdown
Creating perfect Watercolor Christmas Ornament Cookies requires attention to both flavor and structure. Each ingredient plays a specific role in ensuring the cookies hold their shape, taste delicious, and provide an ideal surface for decoration. Below is a detailed breakdown of every component used in this recipe:
- All-Purpose Flour: The foundation of the cookie dough, providing structure and stability. Sifted before use to eliminate lumps and ensure even mixing.
- Baking Powder: A leavening agent that helps the cookies rise slightly while maintaining a tender crumb without spreading too much.
- Salt: Enhances overall flavor and balances the sweetness of the sugar and icing.
- Unsalted Butter (cold): Provides richness and flakiness. Using cold butter ensures the dough stays firm and prevents excessive spreading during baking.
- Granulated Sugar: Adds sweetness and contributes to a crisp edge while keeping the center soft. It also helps create a smooth texture when creamed with butter.
- Large Egg: Binds the ingredients together, adds moisture, and contributes to the structure of the cookie.
- Pure Vanilla Extract: Imparts a warm, aromatic flavor that complements the sweet profile without overpowering it.
- Milk or Heavy Cream: Used sparingly to adjust dough consistency if needed, especially in dry climates.
Royal Icing Ingredients:
- Powdered Sugar (confectioners’ sugar): The base of royal icing; finely ground to produce a smooth, glossy finish once dried.
- Meringue Powder: A safe, shelf-stable alternative to raw egg whites that helps the icing harden properly and achieve a porcelain-like sheen.
- Warm Water: Activates the meringue powder and dissolves the powdered sugar into a workable consistency.
- Food Coloring Gels (various colors): Highly concentrated gel-based colors are preferred over liquid to avoid altering the icing’s consistency. Ideal for creating vibrant yet blendable hues for the watercolor effect.
- Clear Alcohol (vodka or grain alcohol) or Extract (like lemon or vanilla): Used to thin the paint mixture for the watercolor wash, helping colors spread smoothly without disturbing the base layer.
Optional Additions:
- Edible Glitter or Luster Dust: For added shimmer on ornaments, mimicking snow or metallic finishes.
- Edible Gold Leaf or Metallic Pens: To outline or accent details for a luxurious touch.
- Ribbon or Twine: For hanging the cookies after they’re fully set.
Step-by-Step Recipe
Part 1: Making the Sugar Cookie Dough
- Chill Your Tools: Place your mixing bowl and pastry cutter or food processor blade in the freezer for 10 minutes to keep the butter cold throughout mixing.
- Whisk Dry Ingredients: In a medium bowl, sift together 3 cups all-purpose flour, 1/2 teaspoon baking powder, and 1/4 teaspoon salt. Set aside.
- Cream Butter and Sugar: In a stand mixer fitted with the paddle attachment, beat 1 cup (2 sticks) cold unsalted butter (cut into small cubes) with 3/4 cup granulated sugar on medium speed until pale and crumbly (about 3–4 minutes). Do not over-cream, as this can melt the butter.
- Add Wet Ingredients: Add 1 large egg and 2 teaspoons pure vanilla extract. Mix on low until just combined—dough should start coming together but remain slightly shaggy.
- Incorporate Dry Mix: Gradually add the dry ingredients, mixing on low until the dough forms a cohesive ball. If too dry, add 1–2 teaspoons milk. If sticky, add a bit more flour.
- Shape and Chill: Divide dough into two flat disks, wrap tightly in plastic wrap, and refrigerate for at least 2 hours (or up to 3 days).
Part 2: Rolling, Cutting, and Baking
- Preheat Oven: Set oven to 350°F (175°C). Line baking sheets with parchment paper or silicone mats.
- Roll Out Dough: On a lightly floured surface, roll one disk of dough to 1/4-inch thickness. Use a rolling pin with guide rings for uniformity.
- Cut Shapes: Use Christmas ornament-shaped cookie cutters (or any teardrop, round, or oval cutter) to cut out cookies. Transfer carefully to baking sheets using a spatula, spacing about 1 inch apart.
- Create Hanger Hole: Before baking, use a straw or small piping tip to make a hole at the top of each ornament for later stringing.
- Bake: Bake for 9–11 minutes, rotating pans halfway through, until edges are just beginning to turn golden. Centers should still look soft.
- Cool Completely: Let cookies cool on the pan for 5 minutes, then transfer to wire racks to cool completely before decorating.
Part 3: Preparing Royal Icing
- Make Flood Consistency Icing: In a stand mixer, combine 4 cups powdered sugar, 3 tablespoons meringue powder, and 1/3 cup warm water. Beat on low for 1 minute, then increase to high for 3–5 minutes until glossy and stiff peaks form. Cover with a damp cloth to prevent drying.
- Thin for Flooding: Remove 1 cup of icing and gradually stir in water (1/2 teaspoon at a time) until it reaches “flood” consistency—when a ribbon of icing disappears back into the bowl within 10 seconds.
- Color Base Layers: Divide flood icing into bowls and tint with gel food coloring (white, red, green, blue, gold, etc.) for different ornament colors.
Part 4: Decorating with Watercolor Effect
- Flood the Cookies: Use a piping bag or squeeze bottle to outline each cookie, then fill (“flood”) the interior with colored icing. Tilt gently to smooth. Let dry for 4–6 hours or overnight.
- Prepare Watercolor Paints: Mix 1/4 teaspoon clear alcohol (vodka works best) with 1–2 drops of gel food coloring in small containers. Stir well to create translucent washes.
- Apply Watercolor Wash: Using clean, fine-tipped paintbrushes, gently brush the colored alcohol mix onto the dried icing. Start from the center and blend outward. Overlap colors softly for a painterly effect.
- Add Details: Once the wash dries (15–30 minutes), use thicker royal icing to pipe borders, glitter accents, or intricate designs like snowflakes or holly leaves.
- Dry Overnight: Allow decorated cookies to sit uncovered for at least 8–12 hours so the icing fully hardens.
Part 5: Finishing Touches
- Thread Ribbons: Cut 6-inch lengths of satin ribbon, baker’s twine, or edible lace. Thread through the hanger holes and tie into loops.
- Package or Display: Arrange cookies in gift boxes lined with tissue paper, hang on a tree, or display on a dessert platter.
Tips for Perfect Watercolor Christmas Ornament Cookies
- Keep Dough Cold: Warm dough spreads during baking. If it gets soft while rolling, return it to the fridge for 10–15 minutes.
- Use Gel Food Coloring: Liquid colors add excess moisture and can ruin icing consistency. Stick to professional-grade gels or pastes.
- Don’t Rush Drying: Fully dried icing is essential before applying watercolor paint. Any moisture will cause colors to bleed uncontrollably.
- Work in a Dry Environment: Humidity makes royal icing take forever to dry. Use a dehumidifier or fan if necessary.
- Clean Brushes Between Colors: Prevent muddy mixes by rinsing brushes thoroughly with alcohol and wiping dry between uses.
- Practice First: Try your watercolor technique on a spare cookie or plate to get the right hand pressure and color intensity.
- Label Your Colors: Use small sticky notes on paint containers to remember which color is which—especially helpful with similar shades.
- Store Properly: Keep finished cookies in an airtight container with wax paper between layers. They last up to 3 weeks at room temperature.
Variations and Customizations
One of the joys of Watercolor Christmas Ornament Cookies is their versatility. Here are some fun ways to personalize them for different themes, tastes, and occasions:
- Theme-Based Ornaments: Make Hanukkah stars, Kwanzaa candles, winter snow globes, or generic snowflakes for inclusive holiday displays.
- Personalized Names or Initials: Pipe names or family initials in elegant script below the ornament for keepsake gifts.
- Flavor Variations: Add citrus zest (lemon, orange), almond extract, or spices (cinnamon, nutmeg) to the dough for unique flavor profiles.
- Gluten-Free Option: Substitute all-purpose flour with a 1:1 gluten-free baking blend. Add 1/4 teaspoon xanthan gum if not included.
- Vegan Version: Replace butter with vegan shortening, egg with flax egg (1 tbsp ground flax + 3 tbsp water), and use aquafaba-based royal icing instead of meringue powder.
- Mini Ornaments: Use smaller cutters to make bite-sized versions perfect for cookie trays or favors.
- Ombre Effects: Create gradient watercolor looks by blending one color into another (e.g., red fading into pink).
- Stained Glass Look: Leave centers unfilled and insert crushed hard candies before baking for a translucent, jewel-toned effect.
- Blacklight Glow: Use UV-reactive edible paints for a neon party twist—perfect for modern holiday gatherings.
Health Considerations and Nutritional Value
While Watercolor Christmas Ornament Cookies are undeniably festive and delightful, it’s important to consider their nutritional content and potential dietary concerns:
Nutritional Overview (per average-sized cookie, approx. 2 inches):
- Calories: ~120–150 kcal
- Total Fat: 5–7g (mostly from butter)
- Saturated Fat: 3–4g
- Carbohydrates: 20–25g (primarily sugars)
- Sugars: 15–18g (from dough and royal icing)
- Protein: 1–2g
- Sodium: 50–80mg
Dietary Notes:
- High Sugar Content: Due to both the cookie and thick royal icing, these are best enjoyed in moderation, especially for those managing diabetes or watching sugar intake.
- Allergens: Contains dairy (butter), eggs, wheat (gluten), and may contain traces of nuts depending on preparation environment.
- Food Dyes: Some artificial colorings may affect sensitive individuals, particularly children. Opt for natural plant-based dyes when possible.
- Alcohol Use: Small amounts of vodka evaporate quickly and leave no residual alcohol, but can be substituted with lemon extract for non-alcoholic options.
Healthier Swaps:
- Use reduced-sugar royal icing with erythritol or monk fruit sweeteners.
- Bake smaller cookies to reduce portion size.
- Offer alongside healthier treats like fruit skewers or spiced nuts to balance the spread.
- Decorate only select cookies—serve others plain or with light dusting of powdered sugar.
Complete Ingredient List
For the Sugar Cookies:
- 3 cups (360g) all-purpose flour, plus extra for dusting
- 1/2 teaspoon baking powder
- 1/4 teaspoon salt
- 1 cup (230g / 2 sticks) cold unsalted butter, cubed
- 3/4 cup (150g) granulated sugar
- 1 large egg, cold
- 2 teaspoons pure vanilla extract
- 1–2 teaspoons milk (optional, for adjusting dough)
For the Royal Icing:
- 4 cups (480g) powdered sugar, sifted
- 3 tablespoons meringue powder
- 1/3 cup (80ml) warm water
- Gel food coloring (assorted colors: red, green, blue, purple, gold, silver, etc.)
- 1/4 cup (60ml) clear alcohol (vodka or grain alcohol) or lemon extract (for thinning paint)
- Edible glitter, luster dust, or gold leaf (optional)
For Assembly:
- Satin ribbon, baker’s twine, or edible lace (for hanging)
- Ornament-shaped cookie cutters (approx. 2–3 inches tall)
- Small paintbrushes (food-safe, synthetic bristles)
- Piping bags and tips (optional, for outlining)
Detailed Directions
Follow these comprehensive instructions to create show-stopping Watercolor Christmas Ornament Cookies from start to finish:
- Prepare Dough: In a bowl, whisk flour, baking powder, and salt. In a stand mixer, beat cold butter and sugar until crumbly. Add egg and vanilla; mix until incorporated. Gradually add dry ingredients until dough forms. Shape into two disks, wrap, and chill for 2+ hours.
- Preheat & Prepare: Heat oven to 350°F. Line baking sheets with parchment.
- Roll & Cut: Roll chilled dough to 1/4-inch thick. Cut into ornament shapes. Transfer to baking sheets, re-roll scraps once. Poke hanger holes at the top of each.
- Bake: Bake 9–11 minutes until edges are lightly golden. Cool on pans 5 minutes, then move to wire racks to cool completely.
- Make Royal Icing: Combine powdered sugar, meringue powder, and warm water. Beat until glossy. Cover surface with damp cloth.
- Thin for Flooding: Take portions of icing and thin with water (1/2 tsp at a time) to flood consistency.
- Flood Cookies: Outline and fill each cookie with colored icing. Tap pan gently to remove air bubbles. Let dry 4–6 hours or overnight.
- Create Watercolor Paints: Mix gel colors with vodka or extract (1 drop color + 1/4 tsp liquid). Stir well.
- Paint Watercolor Effect: Using fine brushes, apply translucent washes to dried icing. Blend colors softly. Let dry 15–30 minutes.
- Add Final Details: Pipe borders, dots, or snowflakes with contrasting royal icing. Apply edible glitter while wet.
- Dry Overnight: Let cookies sit uncovered for 8–12 hours to fully harden.
- Attach Hangers: Thread ribbon through holes and tie secure loops.
- Display or Gift: Arrange in boxes, hang on trees, or present as handmade gifts.
FAQ (Frequently Asked Questions)
Can I make these cookies ahead of time?
Absolutely! Baked and undecorated cookies freeze well for up to 3 months. Decorated cookies keep in airtight containers for 2–3 weeks at room temperature.
Why did my royal icing crack?
This usually happens if the icing is too thick or applied too heavily. Ensure proper consistency and avoid extreme temperature changes during drying.
Can I use egg whites instead of meringue powder?
Yes, but meringue powder is safer and easier to handle. If using fresh egg whites, use 2 large whites per 4 cups powdered sugar and beat until stiff peaks form.
How do I prevent colors from bleeding?
Ensure the base icing is completely dry before painting. Use minimal liquid in your watercolor mix and blot brushes if too wet.
Are these cookies safe for kids to eat?
Yes, though the alcohol used in painting evaporates quickly. For young children, substitute with lemon or vanilla extract.
Can I bake all the cookies at once?
It’s best to bake in batches to maintain consistent thickness and prevent overcrowding. Rotate pans halfway for even browning.
What if my dough cracks when rolling?
Your dough may be too cold or dry. Let it sit at room temperature for 5–10 minutes, or knead in 1 teaspoon of milk.
Can I use store-bought sugar cookies?
You can, but homemade dough holds edges better and provides a smoother canvas for detailed work.
How do I fix a smudged design?
Wait for it to dry completely, then gently scrape off with a knife and re-flood the area. Let dry again before repainting.
Can I use water instead of alcohol for the paint?
Water can work, but it increases the risk of dissolving the base icing. Alcohol evaporates faster and gives cleaner results.
Summary
Watercolor Christmas Ornament Cookies are a breathtaking fusion of baking and art, transforming simple sugar cookies into edible masterpieces adorned with soft, blended hues reminiscent of holiday watercolor paintings. Perfect for gifting, decorating, or sharing at festive gatherings, these cookies bring joy, creativity, and a touch of elegance to any Christmas celebration.