Introduction
There are few desserts in the culinary world that command as much respect and adoration as the Italian cannolo (plural: cannoli). Originating from the sun-drenched island of Sicily, this pastry is a masterclass in texture. It is a study in contrasts: the shattering, golden crispness of a fried shell against the cool, velvety richness of a sweetened ricotta filling. While often associated with modern bakeries and coffee shops, the true cannolo is a labor of love, a testament to patience, and a centerpiece of Italian celebration.
Making cannoli at home is not merely about baking; it is about connecting with a tradition that spans centuries. The process involves creating a delicate dough infused with wine or vinegar, rolling it to paper-thin transparency, frying it to perfection, and then stuffing it with a filling that balances sweetness with the tang of fresh cheese. Whether you are a seasoned pastry chef or a home cook looking for a weekend project, this guide will walk you through every nuance of creating authentic, restaurant-quality cannoli shells and filling from scratch.
The History
The origins of the cannolo are as rich and debated as its filling. Most food historians agree that the cannolo hails from Sicily, specifically the area around Palermo or Caltanissetta. The name itself comes from the Italian word “cannolo,” meaning “little tube,” referring to the cylindrical metal molds used to shape the pastry.
One of the most enduring legends traces the invention of the cannolo back to the 9th century during the Arab occupation of Sicily. It is said that the dessert was created in the harem of the Emir of Caltanissetta as a treat for his concubines. The shape was purportedly phallic, symbolizing fertility, while the sweet ricotta filling represented the sweetness of life. While this story is colorful, it is likely more folklore than fact.
A more grounded historical perspective links the cannolo to the Carnival season (Carnevale). In Italian culture, Carnival is a time of indulgence before the fasting period of Lent. Fried foods, which are energy-dense and celebratory, are staples of this season. The cannolo, with its fried shell and rich filling, fits perfectly into this tradition. Over time, it evolved from a seasonal treat to a year-round staple, becoming the most iconic symbol of Sicilian pastry making known globally.
Ingredients Breakdown
To achieve the perfect cannolo, one must understand the role of each component. You cannot substitute ingredients lightly without altering the fundamental character of the dessert.
For the Shells (The Dough)
- All-Purpose Flour: The structural backbone. You need a flour with enough protein to hold the shape during frying but not so much that the shell becomes tough like bread.
- Sugar: Adds a hint of sweetness to the dough and promotes browning during the frying process.
- Cocoa Powder (Optional): Traditional in some regions of Sicily, this gives the shells a dark, chocolatey hue and a subtle earthy flavor.
- Lard or Butter: Fat is crucial for flakiness. Traditional recipes often use lard (strutto) for the most authentic, shattering crispness, but cold butter is a common and delicious substitute.
- Egg Yolk: Provides richness and helps bind the dough, giving it a golden color.
- Marsala Wine or White Vinegar: This is the secret weapon. The acidity relaxes the gluten strands, ensuring the shell fries up bubbly and crisp rather than hard and chewy. Marsala adds a distinct aromatic flavor, while vinegar is more neutral.
- Cinnamon: A warm spice that complements the fried dough.
For the Filling
- Ricotta Cheese: The soul of the cannolo. You must use whole-milk ricotta. Crucially, it should be sheep’s milk ricotta (Ricotta di Pecora) if you can find it, as it has a tangier, richer flavor than cow’s milk ricotta. It must be drained thoroughly.
- Confectioners’ Sugar (Powdered Sugar): Unlike granulated sugar, this dissolves instantly into the cheese, creating a smooth texture without graininess.
- Vanilla Extract: High-quality pure vanilla enhances the dairy flavors.
- Mini Chocolate Chips: The classic addition. They provide a burst of bitterness and texture against the creamy white filling.
- Candied Fruit or Pistachios: Often mixed in or used as a garnish on the ends of the cannolo for color and crunch.
Step-by-Step Recipe
Phase 1: Making the Dough
- Combine Dry Ingredients: In a large mixing bowl, whisk together the flour, sugar, cocoa powder (if using), salt, and cinnamon.
- Cut in the Fat: Add the cold lard or butter to the flour mixture. Using a pastry cutter or your fingertips, work the fat into the flour until the mixture resembles coarse crumbs.
- Add Wet Ingredients: In a small cup, mix the egg yolk with the Marsala wine (or vinegar). Pour this into the flour mixture.
- Knead: Bring the dough together with your hands. Knead it on a lightly floured surface for about 5 to 10 minutes until it is smooth, elastic, and no longer sticky. If it feels too dry, add a teaspoon of wine; if too wet, add a dusting of flour.
- Rest: Wrap the dough tightly in plastic wrap and let it rest at room temperature for at least 30 minutes. This relaxes the gluten, making the dough easier to roll thin.
Phase 2: Forming and Frying the Shells
- Prepare the Oil: Pour vegetable oil or peanut oil into a deep pot or Dutch oven. The oil should be about 3 inches deep. Heat it to 360°F (182°C). Use a thermometer; if the oil is too cool, the shells will be greasy. If too hot, they will burn before cooking through.
- Roll the Dough: Divide the dough into four balls. On a floured surface, roll one ball out as thinly as possible. You should be able to almost see through the dough. It should be roughly 1/8 inch thick or less.
- Cut Circles: Use a round cutter (about 4 to 5 inches in diameter) to cut circles from the dough. Re-roll the scraps to use all the dough.
- Wrap the Tubes: Take a metal cannoli tube. Wrap a circle of dough around the tube, overlapping the edges slightly. Brush the overlapping edge with a little water or egg wash to seal it so it doesn’t unravel in the oil.
- Fry: Carefully slide 2 or 3 tubes into the hot oil at a time. Fry for about 2 to 3 minutes, turning occasionally, until the shells are golden brown and bubbly.
- Cool: Remove the shells with tongs and let them drain on a wire rack or paper towels for a minute. While they are still warm (but cool enough to handle), gently slide the metal tube out. If you wait until they are completely cold, the tube might get stuck.
- Repeat: Continue until all dough is used.
Phase 3: Preparing the Filling
- Drain the Ricotta: This is the most critical step. Place the ricotta in a fine-mesh sieve or cheesecloth over a bowl. Let it drain in the refrigerator for at least 4 hours, preferably overnight. You want to remove as much whey as possible.
- Whip: Place the drained ricotta in a mixing bowl. Add the confectioners’ sugar and vanilla extract. Using an electric mixer or a sturdy whisk, beat the mixture until it is smooth and creamy. Do not overmix, or the cheese can become grainy.
- Fold in Mix-ins: Gently fold in the mini chocolate chips, candied orange peel, or chopped pistachios by hand.
- Chill: Keep the filling chilled until you are ready to serve. Cold filling contrasts beautifully with the room-temperature shell.
Phase 4: Assembly
Golden Rule: Never fill the cannoli until the very moment you intend to eat them. If you fill them hours in advance, the moisture from the ricotta will migrate into the shell, turning your crispy masterpiece into a soggy disappointment.
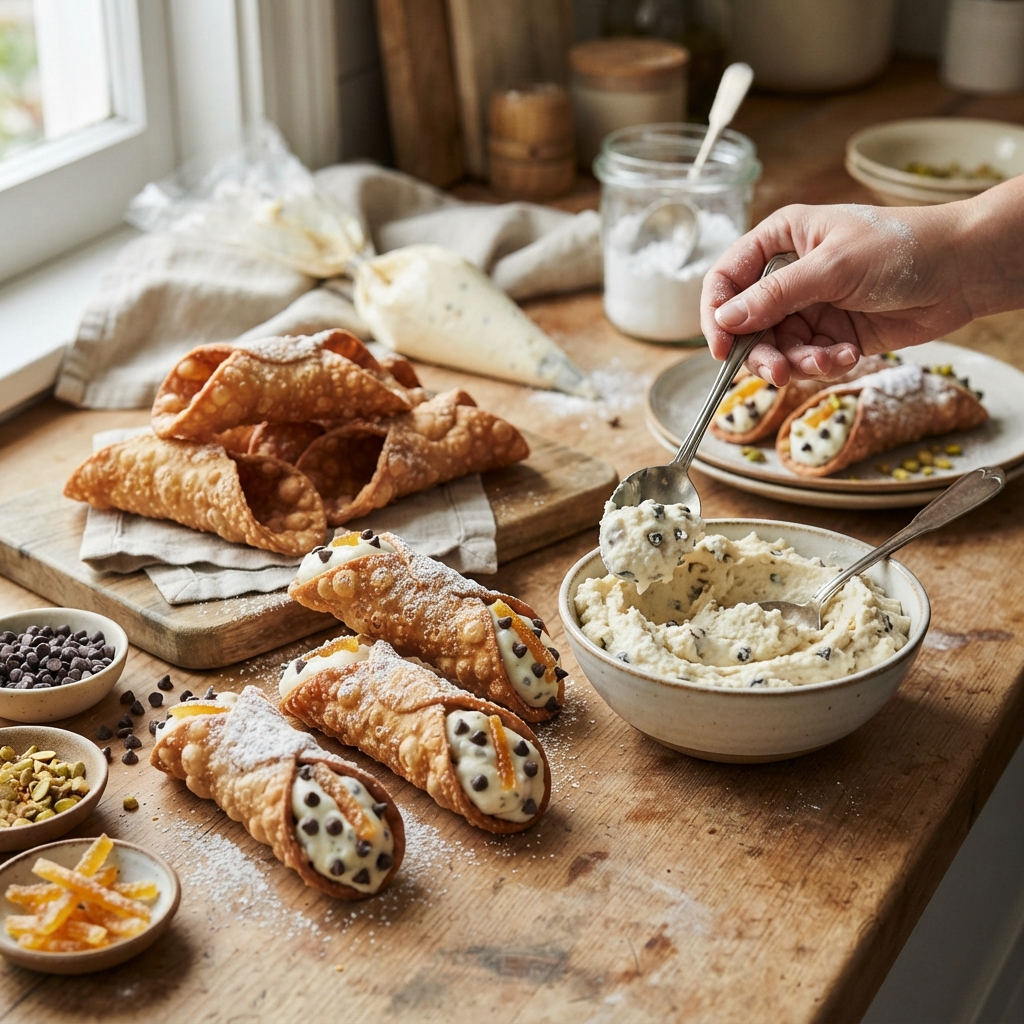
Transfer the filling to a piping bag fitted with a large round tip. Pipe the filling into the shells from both ends, meeting in the middle. Dip the exposed filling ends into chopped pistachios or mini chocolate chips for decoration.
Tips for Success
- The Rolling Pin Trick: To get the dough incredibly thin, some traditional nonnas wrap the dough around the rolling pin itself and roll it out, rather than rolling it flat on the counter. This stretches the dough evenly.
- Oil Temperature Management: When you add the cold dough to the oil, the temperature will drop. Wait for the oil to recover to 360°F before adding the next batch. Fry in small batches to maintain consistent heat.
- Sealing the Dough: Ensure the seam of the dough on the tube is well-sealed with water or egg wash. If it opens up during frying, the shell will lose its tube shape.
- Removing the Tubes: If the metal tube gets stuck, do not force it. You can run warm water over the metal tube (being careful not to wet the shell) to expand the metal slightly, making it easier to slide out.
- Storage: Unfilled shells can be stored in an airtight container at room temperature for up to a week. The filling can be stored in the fridge for 2-3 days.
Variations and Customizations
While the classic ricotta and chocolate chip is the gold standard, the cannolo is a versatile canvas for creativity.
- Pistachio Cannoli: Fold crushed, salted Bronte pistachios into the filling and roll the ends of the filled cannoli in green pistachio crumbs.
- Chocolate Cannoli: Add a tablespoon of unsweetened cocoa powder to the ricotta filling for a chocolate-cream flavor. You can also dip the ends of the finished cannoli in melted dark chocolate.
- Liqueur Infused: Add a splash of Amaretto, Grand Marnier, or Limoncello to the filling for an adult twist.
- Cannoli Cake: For a party, you can layer cannoli filling between sheets of fried dough or sponge cake, creating a deconstructed cannoli trifle.
- Vegan Cannoli: Substitute the ricotta with a firm tofu blended with lemon juice and sugar, or use a cashew-based cream cheese alternative. Use coconut oil or vegan butter for the shells.
Health Considerations and Nutritional Value
It is important to approach the cannolo with the mindset that it is an indulgence. A single standard-sized cannolo can range from 300 to 450 calories, depending on the size of the shell and the amount of filling.
Nutritional Highlights:
- Protein: Ricotta cheese provides a decent amount of protein and calcium.
- Fat: The dessert is high in saturated fats due to the fried shell and the whole-milk cheese. However, if using sheep’s milk ricotta, you gain the benefits of conjugated linoleic acid (CLA).
- Sugar: The filling is high in added sugars.
Making it Lighter: To reduce the caloric load, you can use part-skim ricotta (though the texture will be less rich), reduce the amount of sugar in the filling by 25%, and bake the shells instead of frying them. Note that baked shells will be more like a hard cookie than a flaky, bubbly fry.
Ingredients
For the Shells:
- 2 cups All-purpose flour
- 2 tbsp Granulated sugar
- 1 tsp Unsweetened cocoa powder (optional)
- 1/4 tsp Salt
- 1/2 tsp Ground cinnamon
- 2 tbsp Cold lard or butter, cut into small pieces
- 1 Large egg yolk
- 1/2 cup Sweet Marsala wine (or white vinegar)
- Vegetable oil, for frying
For the Filling:
- 2 lbs Whole milk ricotta cheese (drained overnight)
- 1 cup Confectioners’ sugar
- 1 tsp Pure vanilla extract
- 1/2 cup Mini semi-sweet chocolate chips
- 1/4 cup Candied orange peel or chopped pistachios (optional)
Directions
- Make Dough: Mix flour, sugar, cocoa, salt, and cinnamon. Cut in cold fat. Mix egg yolk and Marsala; add to flour. Knead until smooth. Rest 30 mins.
- Heat Oil: Heat 3 inches of oil in a deep pot to 360°F (182°C).
- Roll & Wrap: Roll dough very thin (1/8 inch). Cut 4-5 inch circles. Wrap around metal tubes, sealing edges with water.
- Fry: Fry shells 2-3 at a time until golden (2-3 mins). Drain. Remove tubes while warm.
- Make Filling: Whip drained ricotta, sugar, and vanilla until smooth. Fold in chocolate chips.
- Fill: Pipe filling into shells just before serving. Dip ends in pistachios or chocolate.
FAQ
Q: Why are my cannoli shells soggy?
A: This usually happens for two reasons. First, the oil temperature was too low, causing the dough to absorb oil rather than fry crisp. Second, and most commonly, the shells were filled too far in advance. Always fill right before serving.
Q: Can I use store-bought shells?
A: Absolutely. While homemade shells have a superior texture and flavor, high-quality store-bought shells are a great time-saver. Just ensure they are fresh and crisp before filling.
Q: My filling is runny. What did I do wrong?
A: The ricotta was likely not drained enough. Ricotta contains a lot of whey. You must drain it in a cheesecloth or fine sieve for several hours (preferably overnight) in the fridge to remove the liquid.
Q: Can I freeze cannoli?
A: You can freeze the unfilled shells in an airtight container for up to 2 months. Re-crisp them in a 350°F oven for 5 minutes before using. Do not freeze the filled cannoli, as the texture will be ruined upon thawing.
Summary
The perfect cannolo requires patience to drain the ricotta and precision to fry the shells to a golden crisp. Fill them only moments before serving to ensure the iconic contrast between the crunchy shell and the creamy, sweet interior.